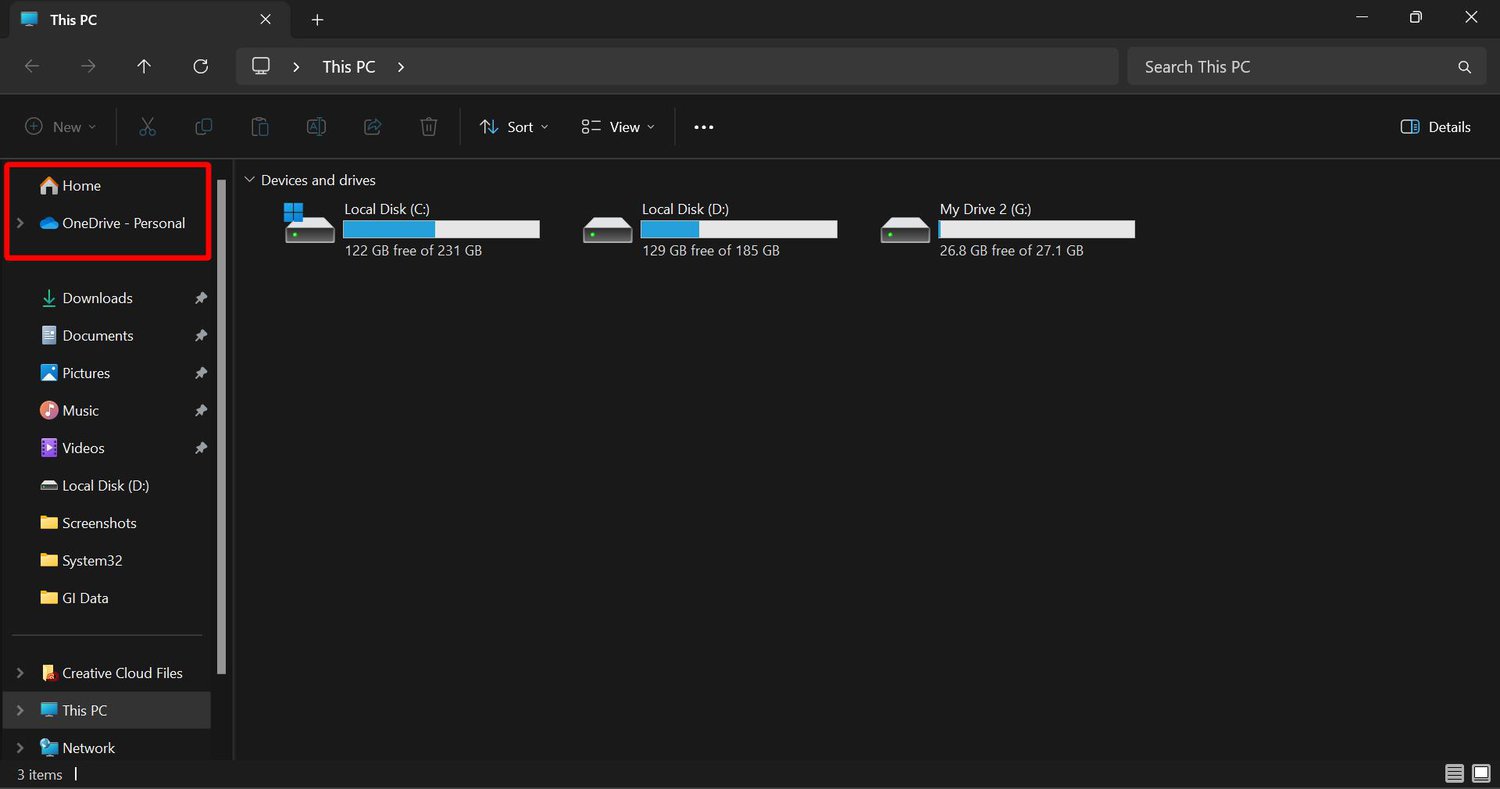
Gallery in Windows 11 File Explorer is a great option to view your photo collection in a minimal and organized way. Sometimes, you may want to remove the “Gallery” option in File Explorer of Windows 11. You may not have to work with Photos or want to give a minimal look to File Explorer by reducing the useless options.
You can hide or remove Gallery from File Explorer in Windows 11 by modifying the registry keys. Remember that removing the Gallery option doesn’t delete your Photos on your computer.

What is Gallery in File Explorer
The Gallery option offers an organized view of all the pictures you have on your computer. You can manage and delete them from here. It categorizes the pictures month-wise. However, you can add collections to it. For example: You can add the Downloads folder in the Gallery Collection so that they will show all the images in it in an organized way.
Automatically Remove Gallery from File Explorer
Modifying the registry file is a complex task and prone to errors. To make your work easier, I have created multiple .reg files which will automatically make the necessary changes to your Registry editor. You can download the .reg file below based on your requirements.
- Download .Reg file to Remove Gallery for Current User
- Download .Reg file to Remove Gallery for All Users
- Download .Reg file to Show Gallery for Current User
- Download .Reg file to Show Gallery for All Users
After downloading the above .reg files according to your needs, follow these steps:
- Double-click on the downloaded .reg file.
- Click Yes in the UAC prompt.
- Again click on Yes.
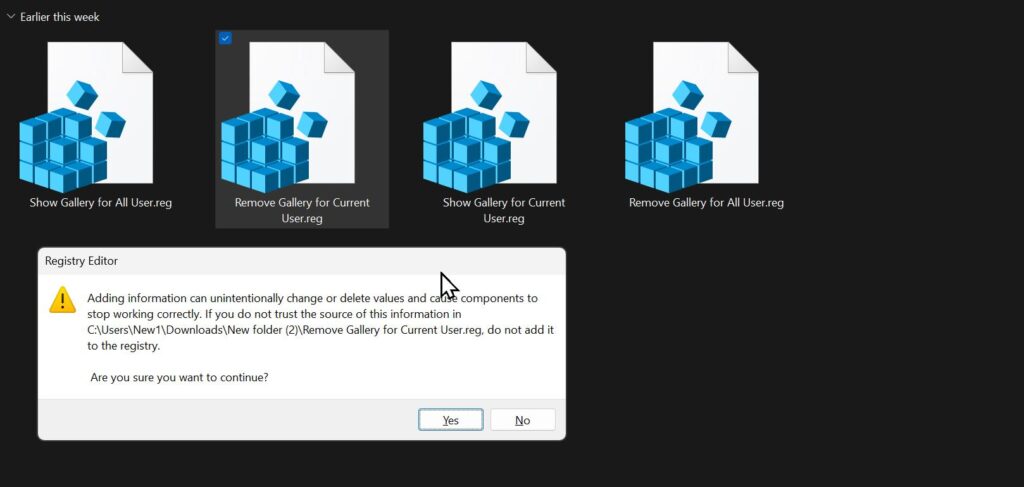
- Choose OK.
- Restart File Explorer to see the effect.
I provided the download links of .reg files which will modify, add, or remove registry files according to their function. For example, The “Remove Gallery for Current User” is used for removing the Gallery option from File Explorer. So, when you open it and follow the above process, this automatically modifies the necessary registry key and removes the Gallery option for the current user.
If you are someone who doesn’t like downloading from external sources, you can still make the changes to your registry editor manually as shown below.
Manually Remove Gallery from File Explorer in Windows 11 for Current User
You can remove Gallery from File Explorer for Current User from the registry editor by following these steps:
Note: Before modifying the Registry, it’s better to take a backup of your registry editor.
Step #1: Open Registry Editor
- Press the Windows + R key.
- Type “Regedit”.
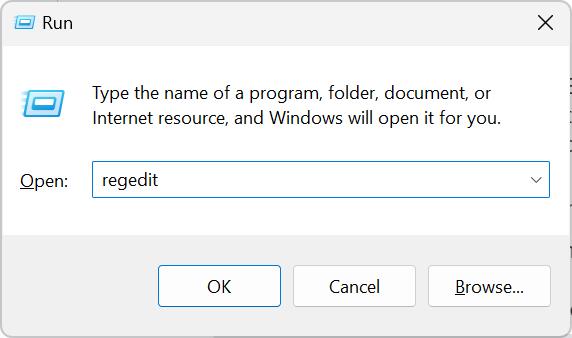
- Press Enter.
- Choose Yes in User Account Control.
Step #2: Navigate the Key
- Write this key on the Address Bar of the registry editor:
HKEY_CURRENT_USER\Software\Classes\CLSID
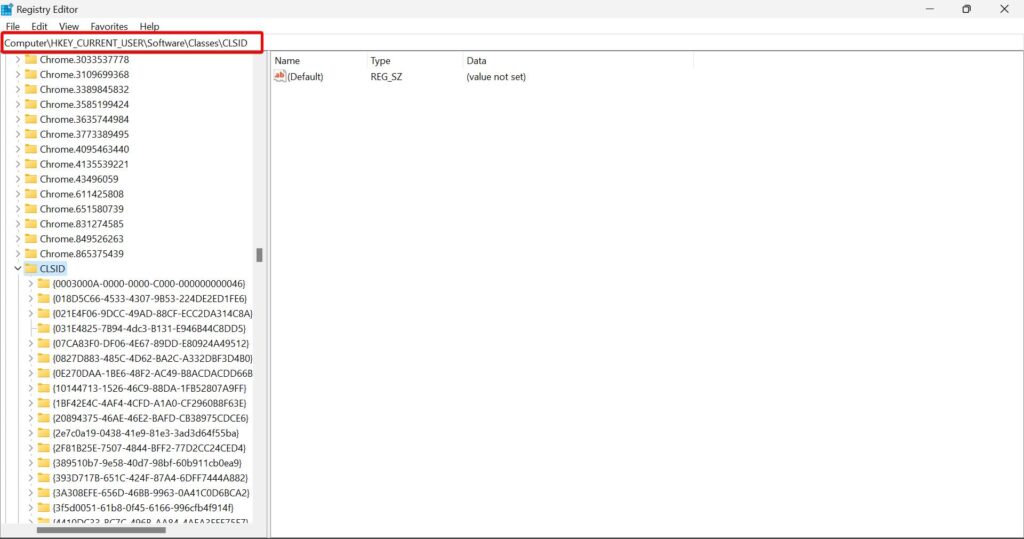
- Press Enter to jump into this location.
Step #3: Create a New Key under CLSID
- Right-click on the CLSID from the left pane.
- Select New > Key.
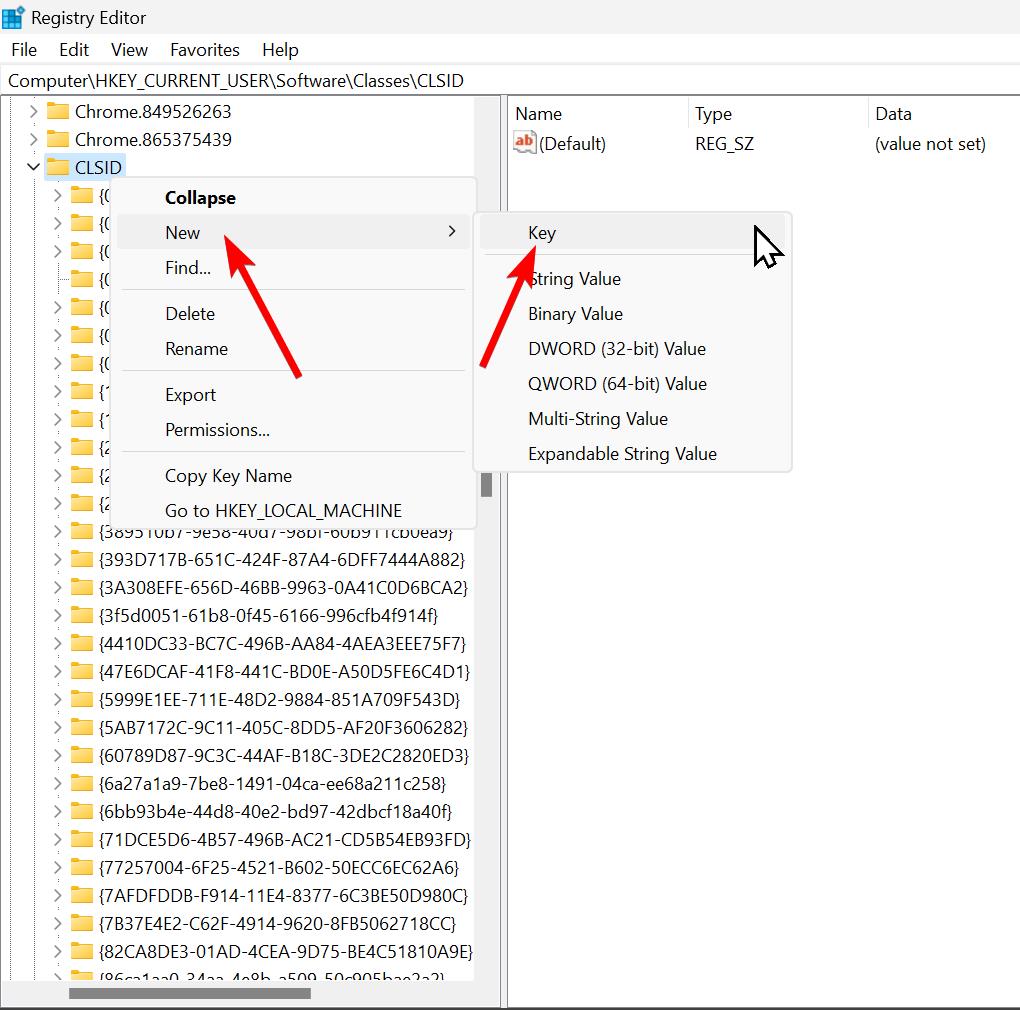
- Name the Key to {e88865ea-0e1c-4e20-9aa6-edcd0212c87c}.

Step #4: Create DWORD Value under Newly Created Key
- Right-click on the newly created key “{e88865ea-0e1c-4e20-9aa6-edcd0212c87c}” from the right pane.
- Select New > Dword (32-bit) Value.
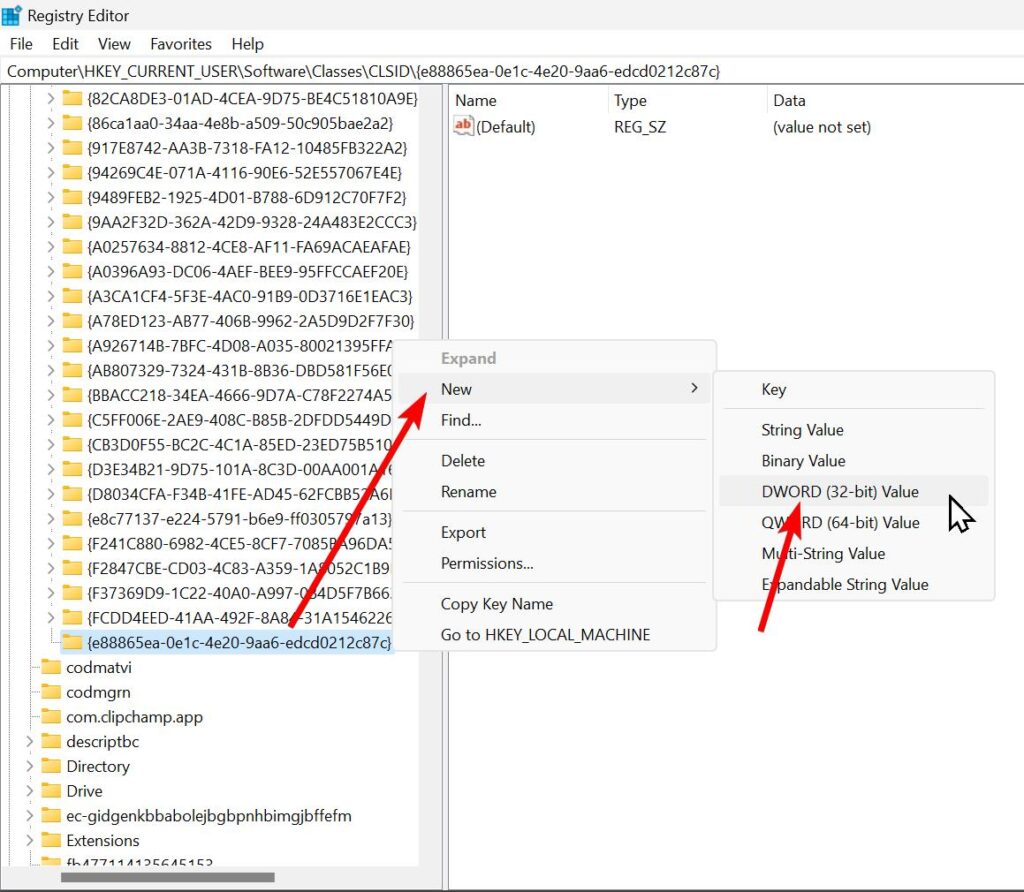
- Name the Value to “System.IsPinnedToNamespaceTree”.

Step #5: Enter 0 in Value Data of Dword Value
- Double-click on the newly created “System.IsPinnedToNamespaceTree” value.
- Write 0 in Value data. 0 for disabling and 1 for enabling the Gallery Option.
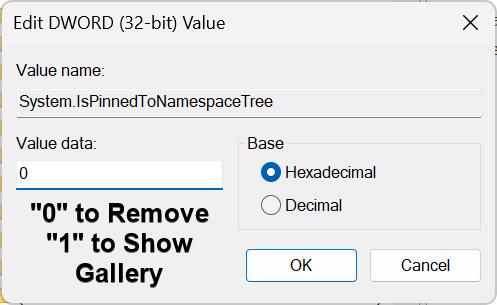
- Press OK.
In this way, you can remove the “Gallery” option from File Explorer in Windows 11. To enable the Gallery Option again, enter 1 in the Value data of the “System.IsPinnedToNamespaceTree” Dword value.
It will immediately reflect the changes in File Explorer. If not, then restart your File Explorer in Windows 11.
Manually Remove Gallery from File Explorer in Windows 11 for All Users
If your computer has more than one user account and wants to remove the Gallery option from all of them. Then, modifying the following Registry can do it:
- Open the registry editor by typing Regedit in the Run dialog.
- Navigate to the path via the address bar of the registry editor.
HKEY_LOCAL_MACHINE\SOFTWARE\Microsoft\Windows\CurrentVersion\Explorer\Desktop\NameSpace_41040327\{e88865ea-0e1c-4e20-9aa6-edcd0212c87c}

- Right-click on the {e88865ea-0e1c-4e20-9aa6-edcd0212c87c} key from the left pane.
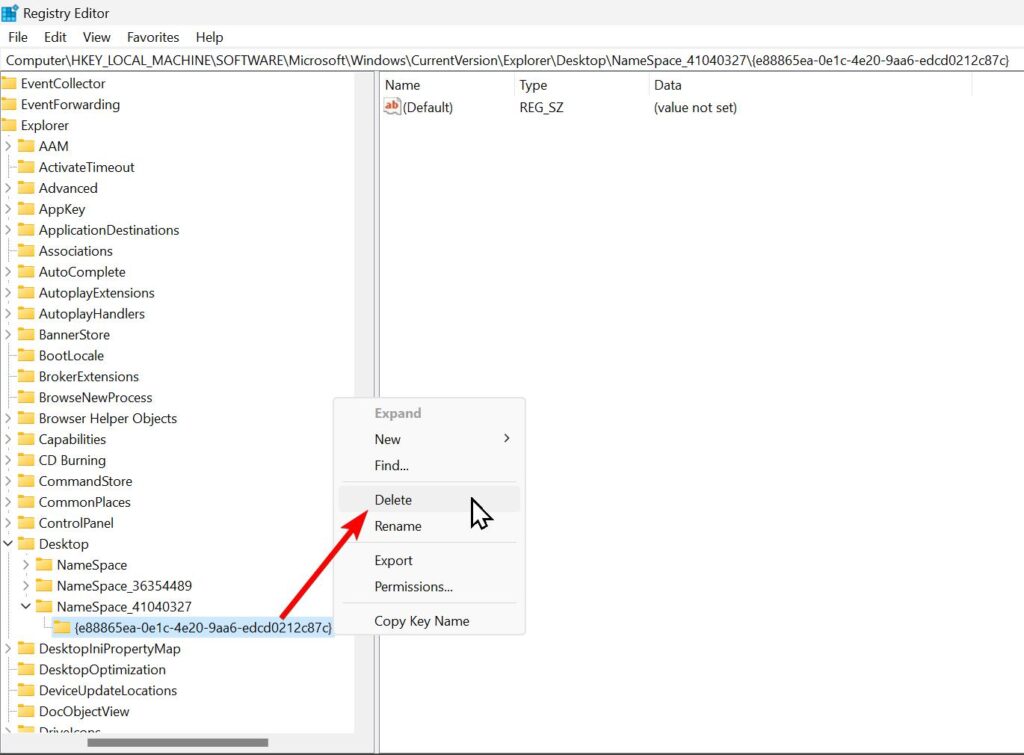
- Select Delete.
- Click Yes.
After deleting this key, the Gallery option will immediately be removed from all the User accounts.
To Get Gallery option back in File Explorer for all user accounts, follow these steps:
- Open the registry editor by typing Regedit in the Run dialog.
- Navigate this path via the address bar of the registry editor.
HKEY_LOCAL_MACHINE\SOFTWARE\Microsoft\Windows\CurrentVersion\Explorer\Desktop\NameSpace_41040327 - Right-click on the NameSpace_41040327 key from the left pane.
- Choose New > Key.
- Name the key to {e88865ea-0e1c-4e20-9aa6-edcd0212c87c}.

- Press Enter.
After adding this key, the Gallery option will immediately show on all the User accounts.
Should I remove Gallery from File Explorer?
If you don’t have to work with the Gallery folder or you want a minimal look in the File Explorer, then you can remove this option. On the other hand, if you want pictures in an organized way (month-wise), then you should keep this option enabled in File Explorer. Ultimately it is a personal choice and it was easy to toggle the visibility of Galley option in the File Explorer.
