USB drives are very important devices which are useful for expanding the backup and storage capacity. But, there might be some instances where you need to share USB over network to access them remotely.
There are many software’s available for Windows, Mac, and Linux to share USB over ethernet or network. With these tools, it is very easy to access your USB devices from any corner in the world. The best part is you can literally share any USB devices including printers, scanner, webcams, mouse, keyword and what not. The sky is the limit.
Real-time possibilities of sharing USB device over the network
- In an office environment, you can connect printer and scanner to master computer and share it with all remaining office computers/laptop. Your team can print the documents without leaving their desk.
- In the same way, you can connect USB pen drive or hard drive which contains frequently updated and accessed data to a master computer. Your entire team is now able to see the real-time data without replacing the old data every time.
- Want to access any data from your home computer at your office? Not a problem, just share the USB drive on your home computer before leaving to the office. You can access and modify the USB device place in your home directly from the office.
Also Read: How to share large video files from iPhone to any device
Step by step guide to share USB over Network
USB Network Gate software helps to share one or multiple USB devices over network which can be later accessed anywhere from the world.
Steps to share any USB device over the network/ethernet
- Install “USB Network Gate” software on the server and client(remote) computer.
- Connect the USB device to the Server.
- Set a password and Share the device.
- On the remote computer, click Add Server button.
- Enter server public IP address.
- Enter the password to access the device shared over the network.
In a similar way, you can connect multiple USB devices over the network and access them anywhere in the world. Let’s go deep and check the detailed steps to share USB over Ethernet or WiFi.
1. Installing USB Network Gate software on both server and remote computers
You need to first download and install USB Network Gate on both server and remote devices.
- Server device: The computer or laptop where the actual USB device is connected and shared.
- Client (remote): The computer or laptop where the shared USB device is accessed. You can connect multiple remote devices to a single server device.
USB Network gate is operating system independent. In simple words, it works on any combination of Windows, Mac, and Linux.
For example, the server device is running on Windows and two computers running on Mac and Linux are acting as the remote machines.
In this example, we’re using Windows 10 computer as server and MacBook Pro as the remote device.
Installing USB Network Gate on Windows (Server Device)
To install this software on Windows 10 server computer:
- Download the .exe file from the official website here.
- Double-click the downloaded file to begin the installation process.
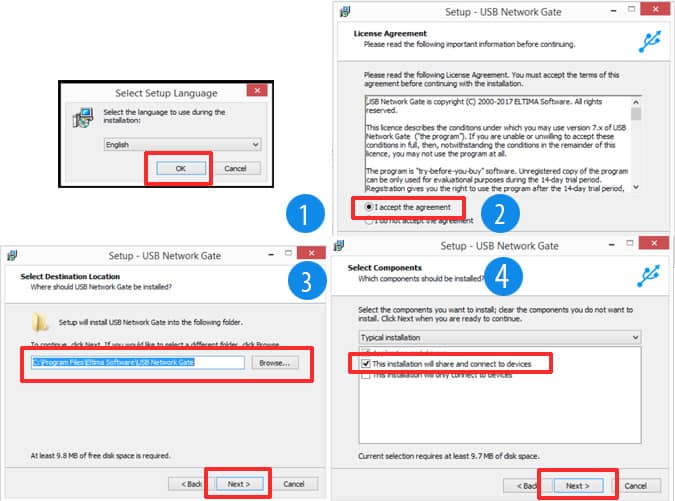
- Choose the language, select “I accept the agreement” and click Next.
- Select the folder where you wish to install the software (Leave it to default if you are not sure) and click on Next.
- Select “This installation will share and connect to devices” and click Next.
- Click Install to start installing the software on your computer.
- Click on Finish complete the setup.
Installing USB Network Gate on Mac (Remote Device)
- Download USB Network Gate for Mac setup file.
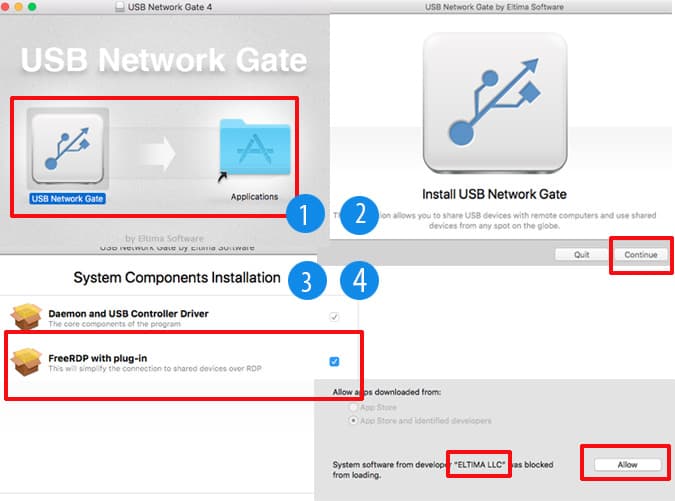
- Double-click the downloaded .dmg file to extract the file contents.
- Drag “USB Network Gate” to Applications folder.
- Click Continue after the installation process is started.
- Check “FreeRDP with Plug-in” and click Continue.
- When prompted, you need to allow the developer “ELTIMA LLC” in System Preferences to open the software.
Once the installation setup is over on all server and remote devices, you can start sharing and accessing the USB over internet.
2. Connect and share USB device on the server device
To share USB over network, you need to have a master computer which acts as the server. You can connect one or more USB devices to it and access them anywhere on one or more multiple computers.
Steps to share USB over Ethernet or Network
- Connect the USB device to the computer which you want to share.
- Open USB Network Gate software.
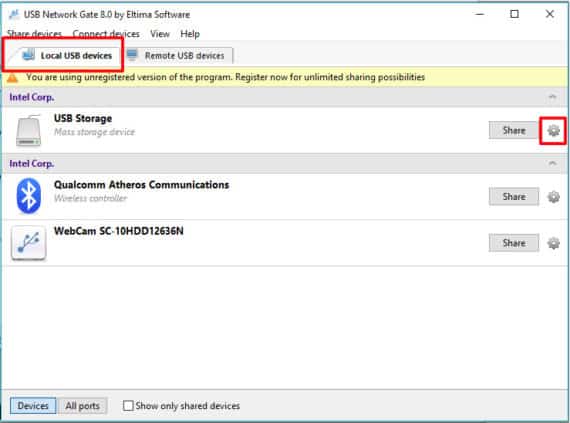
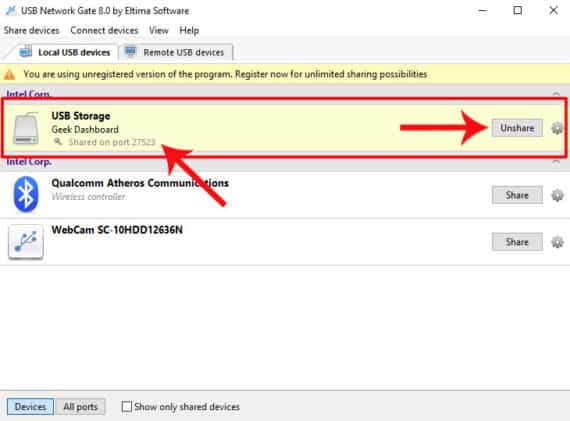
- Under Local USB devices, select the connected USB device.
- Click on the Settings icon on the right side of selected USB device.
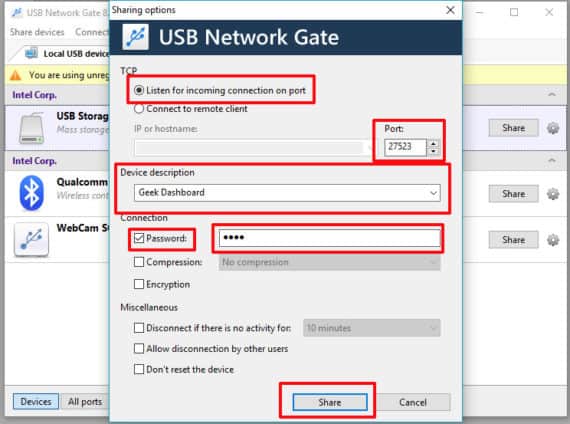
- Enable Password field and enter your desired password. (Password protecting the USB device while sharing is always safe and secure)
- Compression and Encryption fields are optional. You can either enable or disable it. Enabling them will slow down the USB device access on the remote computer.
- Change the port number (Optional) if required. You need to make sure no other software on your server computer is using that port number. Port number should be in between 1024 and 49151.
- Click Share to start sharing that USB device over Ethernet or network.
You need to repeat these steps for every USB device you need to share. Port number must be different for each USB device you are sharing.
Also Read: How to send encrypted emails from Gmail
After sharing a USB device, it will become inaccessible for the local usage. Don’t worry, you can connect to it again from the Remote USB devices tab.
Technically you will be accessing your locally connected USB device over the network. In simpler words, your computer will behave as both server and remote client device at the same time.
3. Access the shared USB device from the remote device
In the previous step, you have shared a USB device from your server computer. Here are the steps to access the USB device remotely over the internet.
- Open “USB Network Gate” on remote computer or laptop.
- Click on “Remote USB devices” tab.
- If the server and client remote computers are connected to the same router, then the shared devices are displayed automatically.
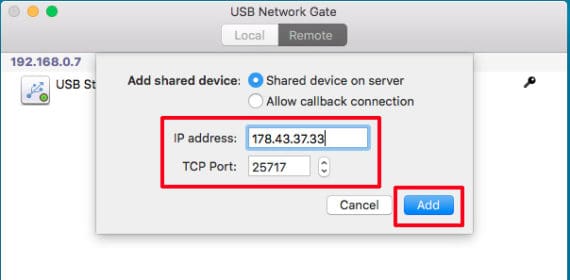
- If they are connected to different routers, then we need to manually connect to the server computer. To do this click on Add Server button.
- Enter the public IP address of the server computer and click Add.
- Now all the shared devices from server computer are listed automatically.
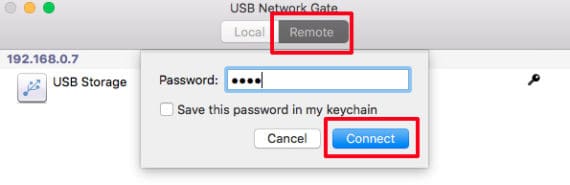
- Select the device and click Connect.
- Enter the password to establish the connection.
This is how you can connect USB over network and access them anywhere on the earth until both computers are have working internet connection.
If the device is a pen drive or hard drive, a new icon will be shown on the desktop. If it is a printer, it will be shown automatically in print dialog.
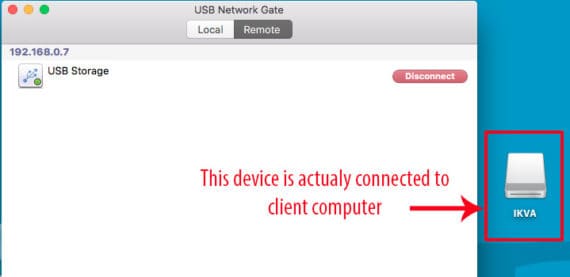
Technically the USB device on the server computer is remotely connected to your device and fools your computer as if it is really connected.
If you want to connect to single USB device instead of connecting to the entire server computer, then click on Add device option under Device menu.This option is helpful when the server does not want to share all connected USB devices to the entire team. Why do marketing team should see the USB devices of the development team? Makes sense right.
Final words
USB Network Gate is indeed an amazing software which is useful to share a USB over network. The software comes with the best value for money, and you will never regret to have this software on your computer.
With this software, you can share USB devices like pen drives, hard disks, printers, mouse, keyboard, micro SD card etc from your home computer to office computer over the internet. If you want to share the same within your office, you can share USB over Ethernet.
Trialling USB Network Gate.
Windows 10 PC connected to Netgear Router.
USB HDD (was connected to the PC) now has been connected to the same router (unplugged the USB cable from the back of the PC and plugged that USB cable into the back of the router).
Followed the USB Network Gate instructions to share USB device on the server device (i.e. this PC). The USB device is now GREEN and says “Connected to My-PC” (shows the ‘key icon because I password protected it).
However, I cannot ‘see’ this USB HDD from explorer>Network or from This PC.
What should I do next? – I am not a PC or Network expert, but I can follow instructions.
Hope you can help me.
Thanks and regards
Chris