FRP or Factory Reset Protection is an incredibly powerful security feature. However, it can get quite frustrating when you never intended to use this feature or when it becomes a hindrance.
FRP prevents access to an Android device after a factory reset until the login credentials of the associated Google account are entered. This is very inconvenient when you forget your account details or password or both.
Without a password or other account credentials, you cannot use your phone. Users have also reported that they’ve been unable to use their second-hand phones because of FRP. Purchased second-hand phones often have previous users’ Google Accounts logged in.
Whichever the case may be, the hindrance is equally frustrating. Is there any way you can bypass the account verification screen and gain access to the device?
The answer is YES!
FRP locks can be removed on Android Samsung devices using DroidKit. It is a fantastic application for bypassing the account verification screen after a factory reset and removing the FRP lock along with the associated account.
Let’s have a closer look at this issue and the process behind resolving it.
What is FRP?
FRP or Factory Reset Protection is a feature introduced by Google which prevents access to Android devices after a factory reset to protect against misuse of the phone if falls into the wrong hands or gets misplaced/lost.
It also prevents malicious users from factory resetting your device without your consent. It can only be performed if your Google Account login credentials are entered.
This is very useful in adding a layer of security to your phone if you lose it.
What is DroidKit?
DroidKit is a tech company focusing on providing maintenance and technical solutions to Apple and Android users alike. With over 8 million users, they provide solutions relating to recovery of corrupt or lost data, system recovery, OS configurations, lock screen problems, etc.
DroidKit is the software that we will be showcasing in bypassing the account verification screen and removing the FRP lock and the associated Google Account entirely.
- DroidKit has an incredibly user-friendly interface, which makes it easy for anyone to avail of their services. It can easily let you remove the FRP lock with a simple and secure process.
- You might be concerned about downloading risky APK files and giving personal information, but rest assured. You will not be asked to download APK files or for your details.
- Millions of users have reported success at removing FRP locks through DroidKit, vouching for its high success rate. As long as your phone is on the list of supported devices, you’re good to go.
- The process of removing the FRP lock and bypassing the account verification screen is straightforward. There are no tedious steps involved; so let’s take a look at the procedure.
How to Remove FRP Lock using DroidKit (Step-by-Step)
Here is a step-by-step process of removing FRP Lock using DroidKit and bypassing the account verification screen upon factory reset.
STEP 1: Install DroidKit
First and foremost, you’ll need a laptop. Download DroidKit on your laptop from the iMobie website. DroidKit is available for both Windows and Mac devices. For this tutorial, we’ll be using a Windows laptop.
After downloading the .exe file, run it. Follow the steps for installation.
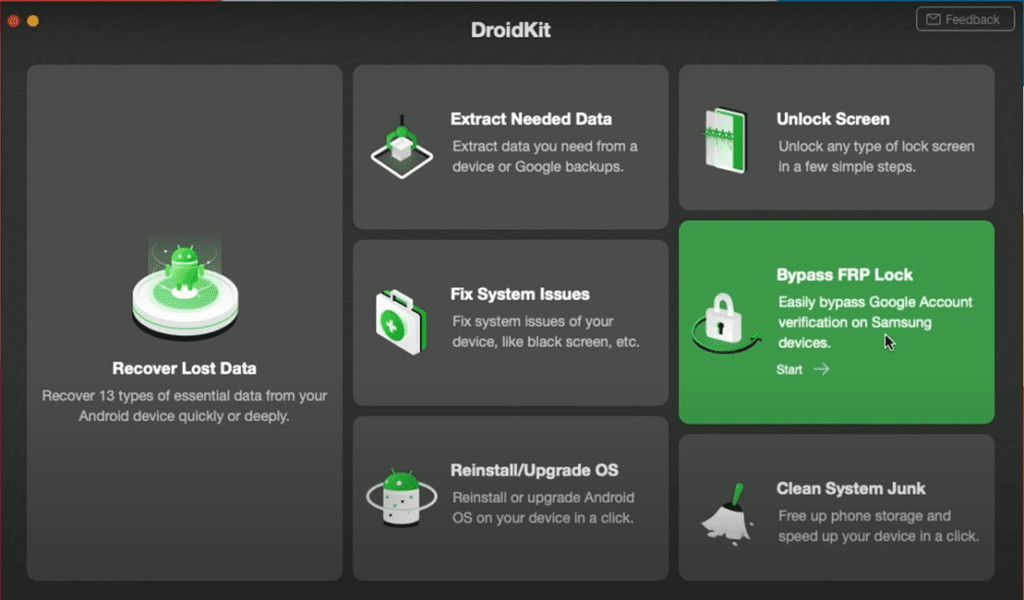
STEP 2: Select “Bypass FRP Lock”
You will be presented with multiple options as shown below. Click on “Bypass FRP Lock.”
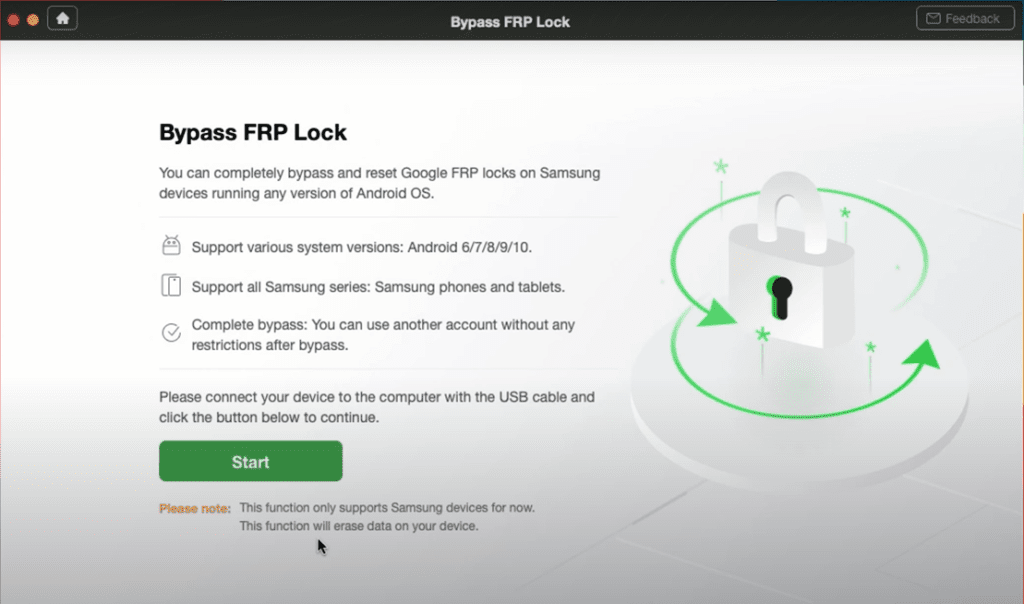
The following screen should appear.
Take a look at the supported versions and devices, and click on “Start”
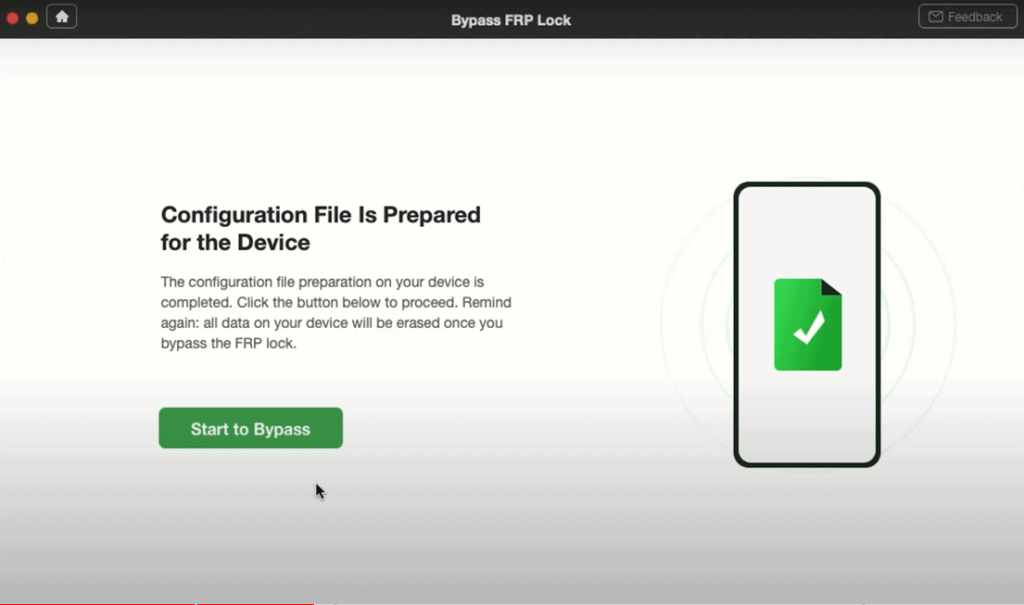
The configuration file will be prepared. The loading will look like this:
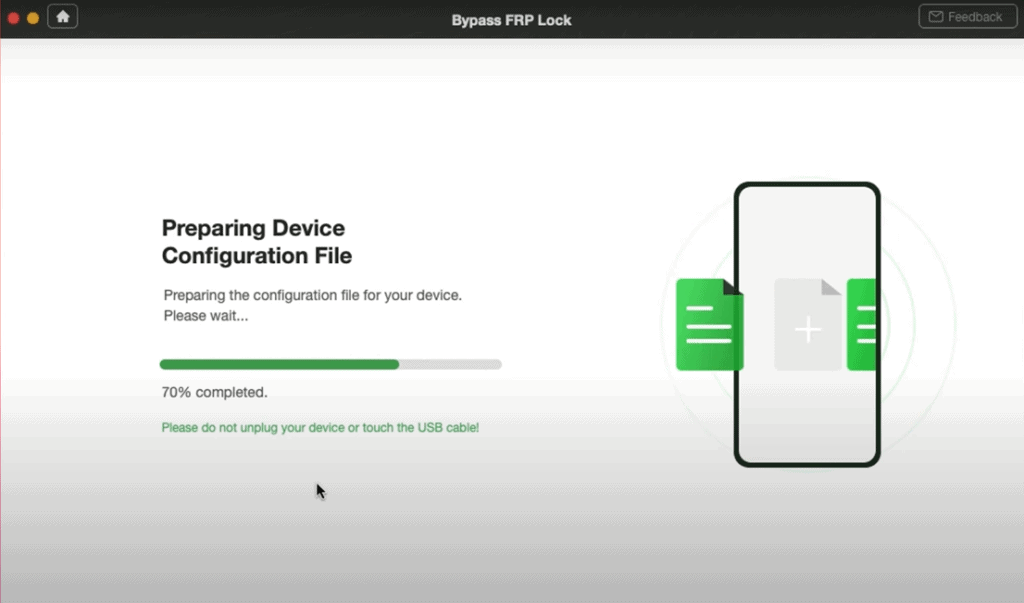
Once it loads, click on “Press to Bypass.”
STEP 3: Put Device in Recovery Mode
Next, your device has to be in recovery mode. Don’t worry if you don’t know how to do it. The next screen that appears will provide instructions for the same.
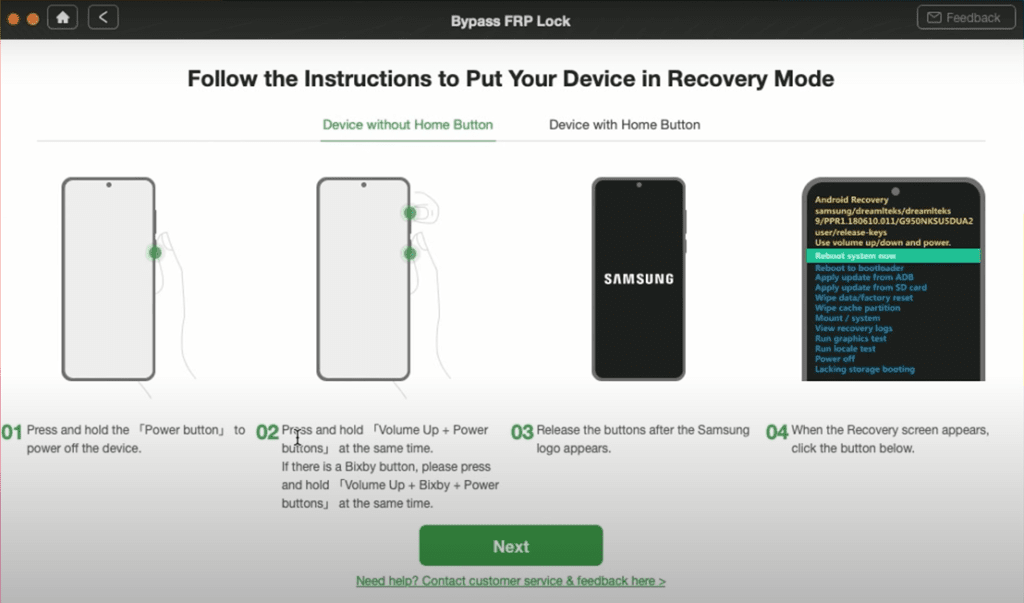
- Press-hold the Power button of the phone to turn it off.
- Press and hold the volume up and power buttons together. Samsung phones also have a “Bixby button” at times. Press and hold that too along with the other two if you have it on your device.
- The Samsung logo should appear after a short while. Release the held buttons once it does.
- Lines of options should get listed. Your device is now in Recovery Mode.
Click on “Next.”
STEP 4: Select Android OS Version
The next step involves selecting the Android OS version of your device. You need to select the OS correctly, so ensure that you check your device’s Android version beforehand. The screens should appear as follows:
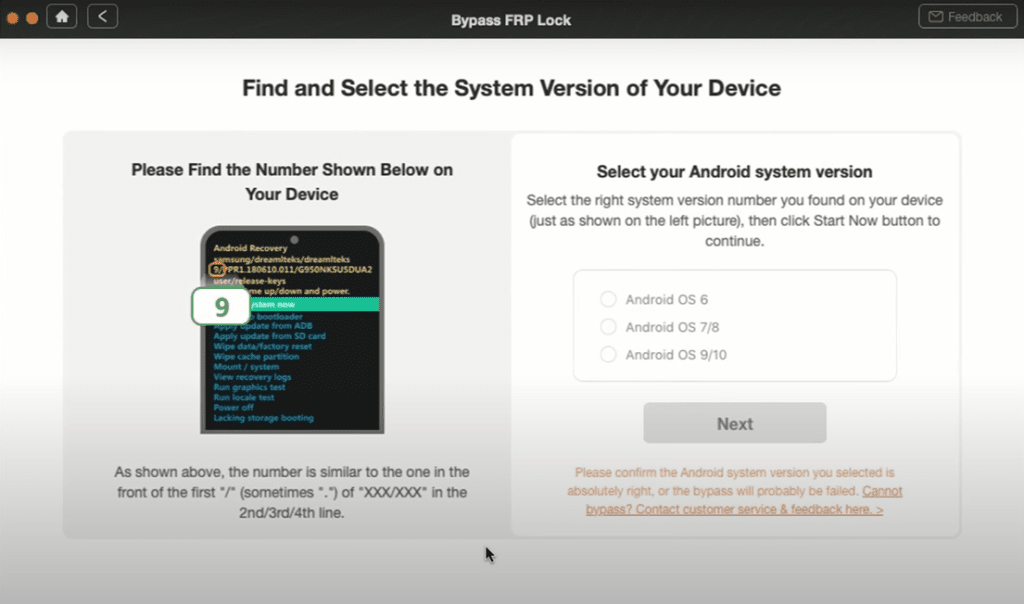
Click “Next” once you select the Android OS version.
STEP 5: Wipe Cache Partition
The next set of screens that appear shall provide detailed instructions on how to wipe the cache partition. Follow the instructions carefully:
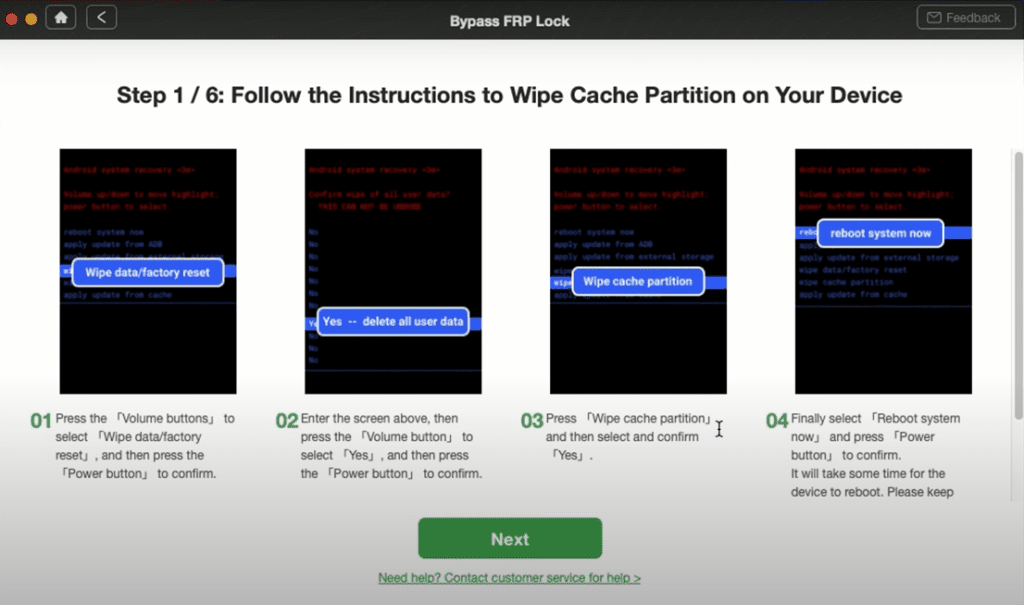
- Using the volume button to scroll, select “Wipe data/factory reset” and confirm using the Power button.
- Scroll down to “Yes” on the following screen, and confirm using the power button again.
- Select “Wipe cache partition” and select “Yes.” Confirm using the power button.
- Select “Reboot system now” and confirm. This will reboot the device, which may take time.
STEP 6: Enter Current Password
After the phone reboots, follow the next given steps.
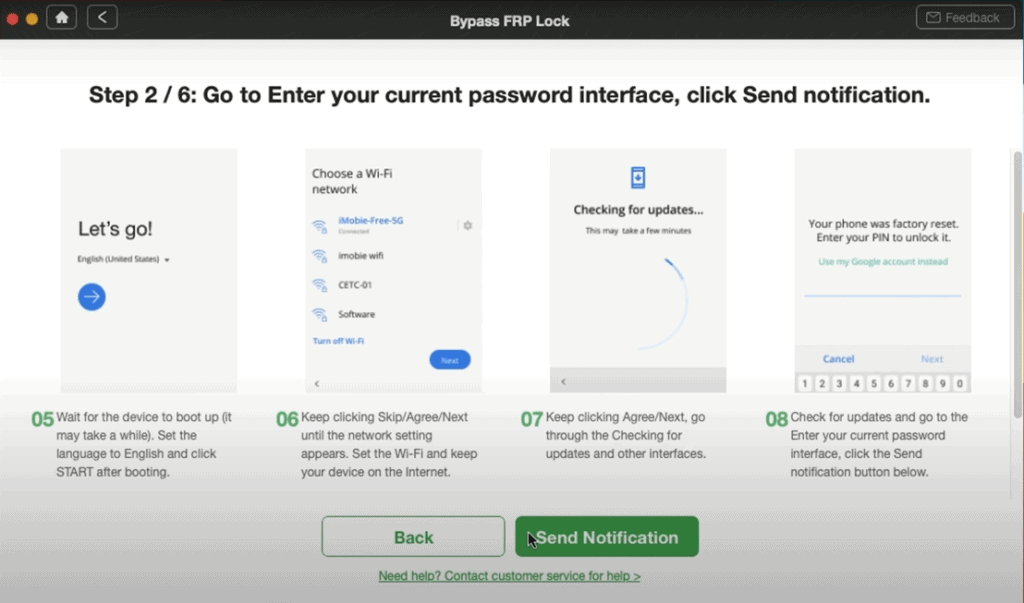
- Select the language and click “Start.”
- Keep going through the screens that appear until you reach the screen for choosing a Wi-Fi network. Select your Wi-Fi (same as your laptop) to connect to the internet.
- Keep going through screens till the checking for updates and other interfaces screens.
- Check for updates.
- Go to the ‘enter your current password’ screen and click the “Send notification” button on the DroidKit software.
STEP 7: Install Samsung Browser
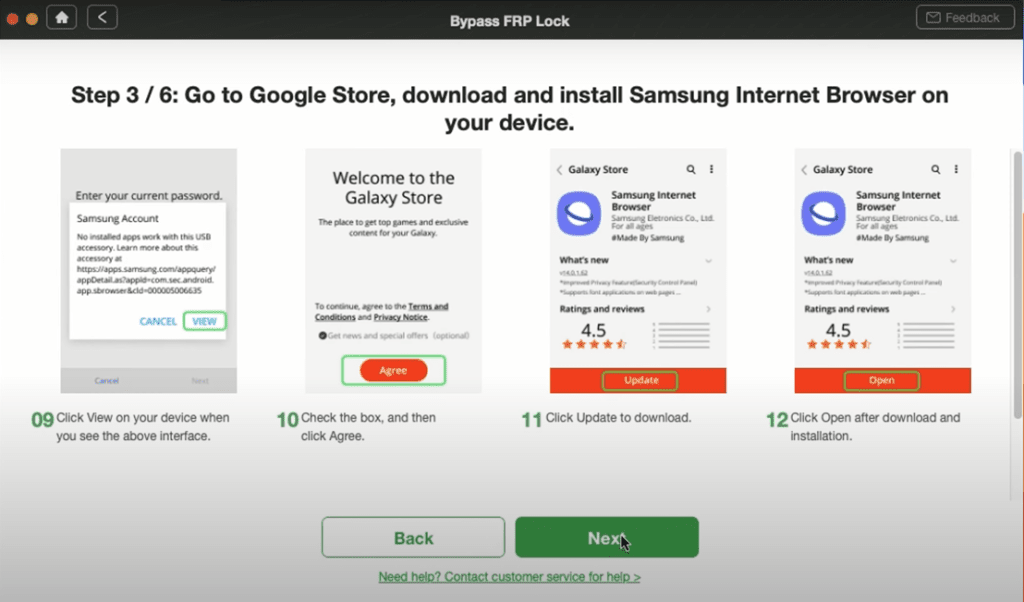
- Click on “View” as the above screen appears.
- Click on “Agree” and then “Update.”
- Open it after installation.
STEP 8: Enter Protect your Phone
After you open the application, follow the next set of instructions.
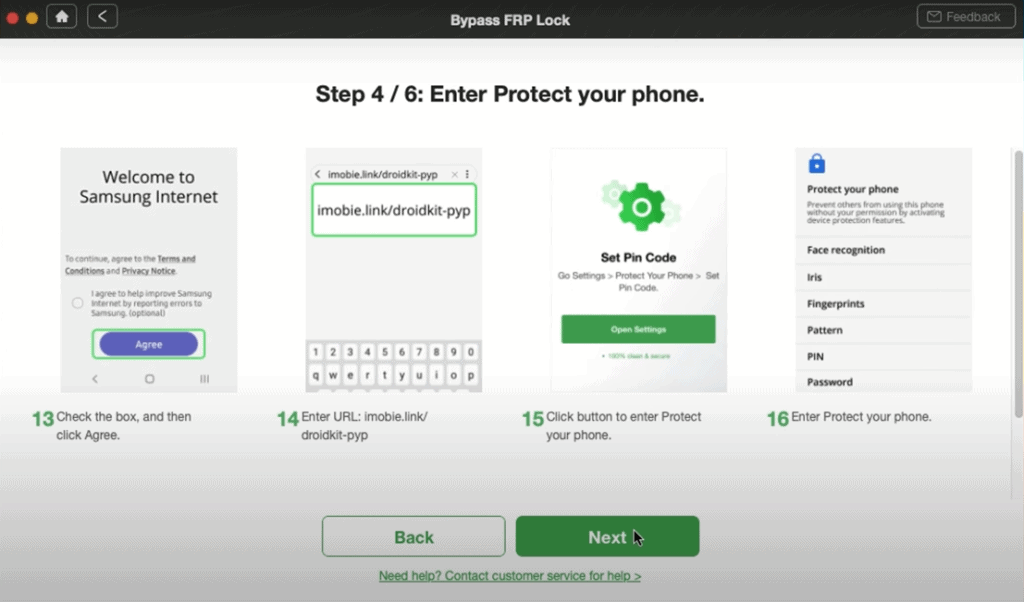
- Click on “Agree” after checking the box.
- Enter this URL:
imobie.link/droidkit-pyp - Click on “Settings” and then “Protect your phone.”
STEP 9: Set PIN
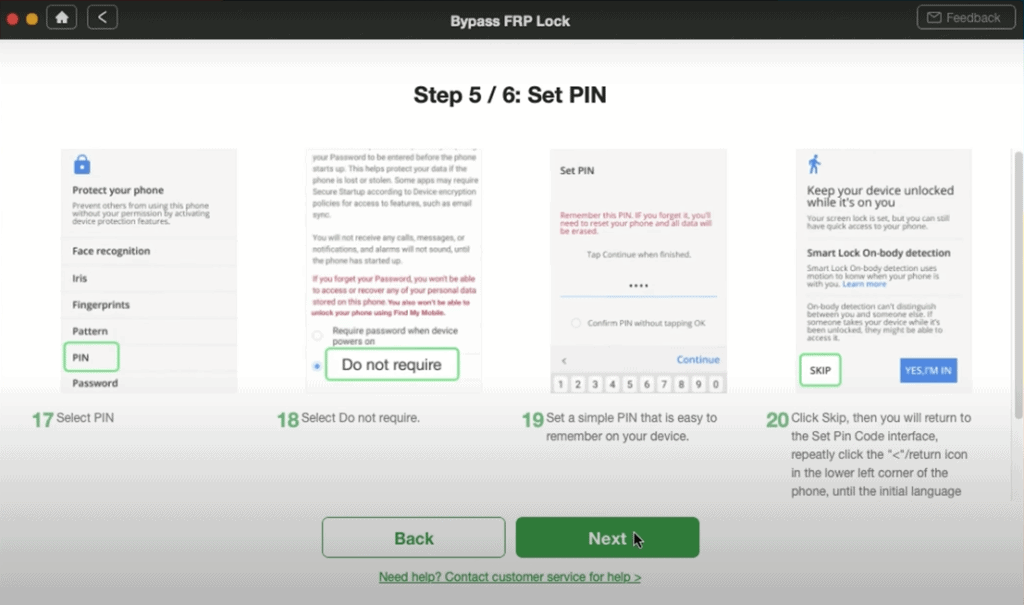
- Click on “PIN” from “Protect your phone.”
- Check “Do not require.”
- Enter a PIN code and select “Skip” on the “Keep your device unlocked while it’s on you” screen.
- Go back to the language selection settings once this is done.
STEP 10: Enter New PIN
Once you are back to the language selection menu, follow the steps:
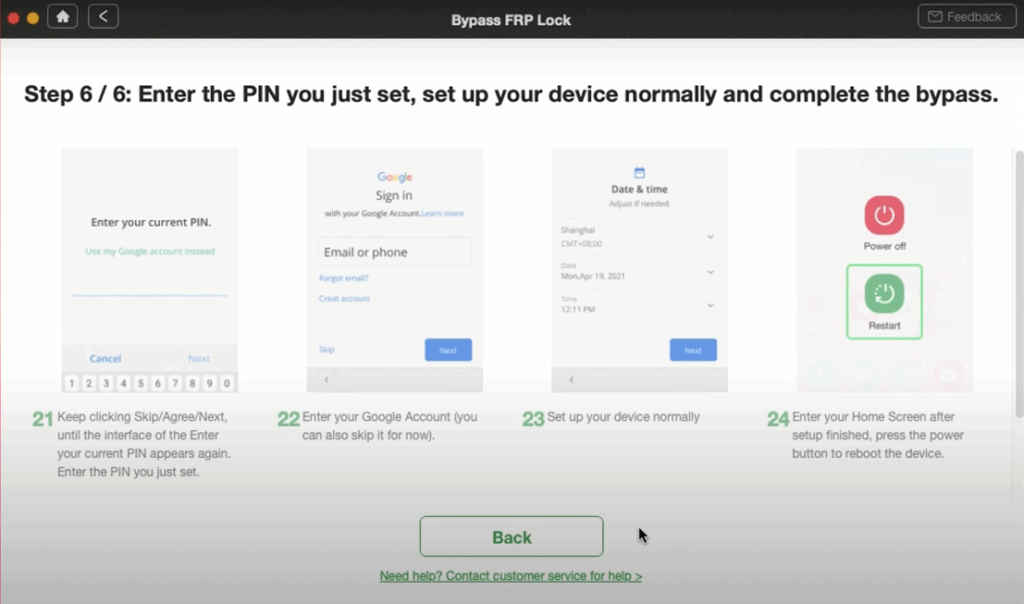
- Go through the screens that appear until you get to “Enter your current PIN.”
- Enter the PIN.
- Put in your Google Account info if you’d like. You can also do this later.
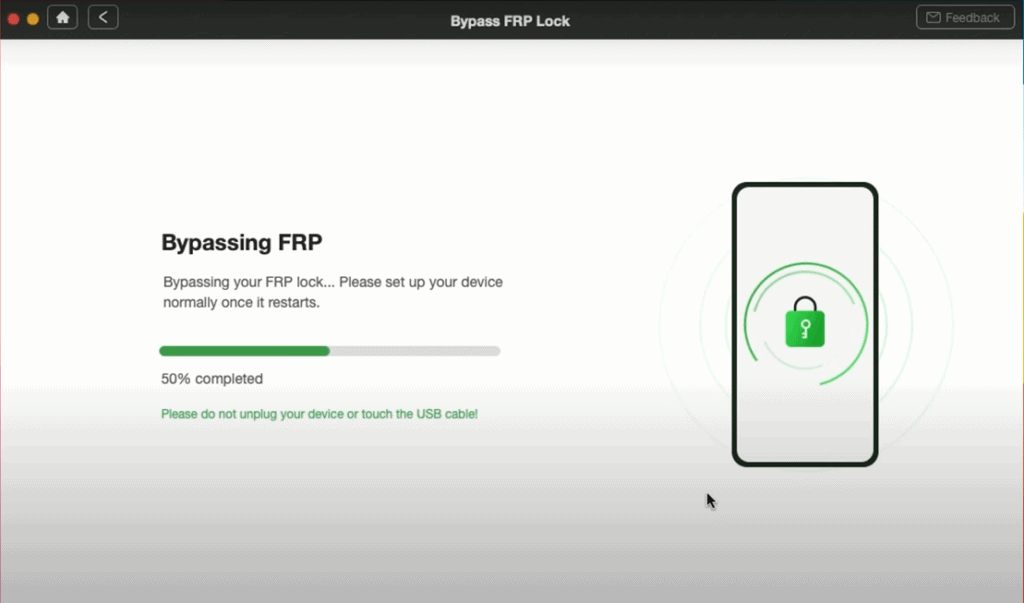
- Set up your device normally.
DroidKit will now bypass the FRP lock. This may take some time.
Once the FRP Lock is bypassed, click on “Complete”
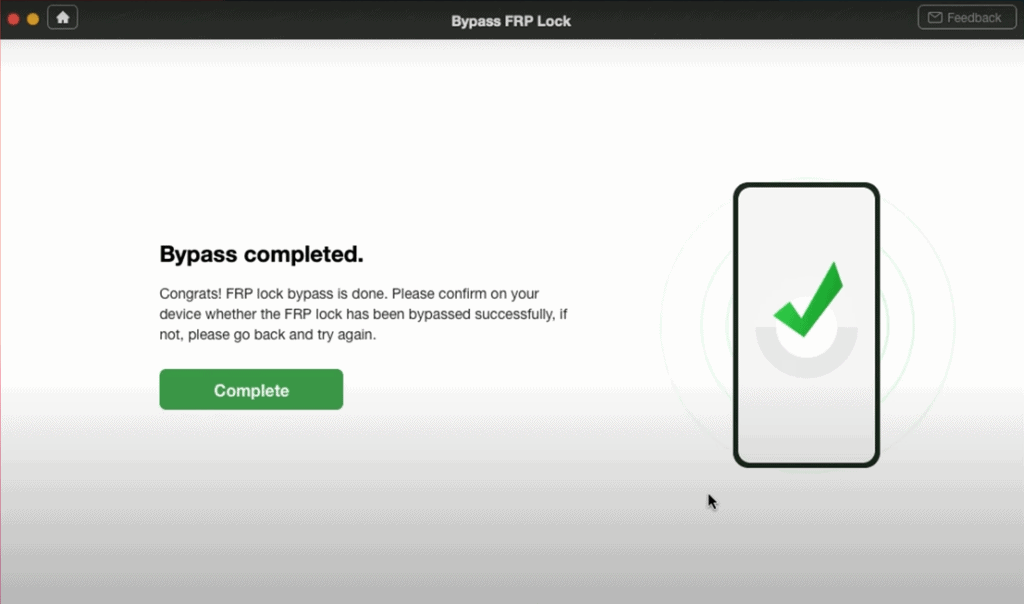
You’re done! You just successfully bypassed the FRP Lock.
Conclusion
FRP Lock is a fantastic security feature, but as mentioned above, it can be inconvenient if you forget your Google Account credentials or get a phone with an FRP lock.
DroidKit is a fantastic software that will help you bypass the FRP lock and get through the account verification screen. It is increasingly successful at resolving technical issues with many happy users. We recommend checking out DroidKit for other technical solutions you might need.