Email is the most common method of communication in both personal and professional life. It is an essential tool for exchanging information, ideas, and messages with others, and it is used by millions of people worldwide. Most working professionals rely on Gmail to send and receive emails and a major portion of them are using Android smartphones.
Recently many users started reporting delayed notification issues on Gmail. Some of them complained about not getting notifications for new emails, delays in receiving messages via Gmail, and many issues related to notification delivery from Gmail.
This can be a serious problem for many users. Missing an important email due to delayed notifications can have serious consequences, particularly in the professional field. If you miss an important email from the client, it could result in lost revenue. Similarly, missing an email with critical instructions or tasks related to your job could hurt your work life.
Fortunately, there are easy ways to fix delayed email notifications in Gmail by changing app notification settings, clearing the app cache, removing battery optimization, and more to prevent missing important emails. In this guide, we are sharing 13 proven solutions to fix delayed or no Gmail notifications on Android.
Common Causes of Delayed Gmail Notifications in Android
There could be several reasons why Gmail notifications may be delayed on Android devices. One reason could be notifications are not turned on or configured improperly in the Gmail settings. Another possible reason could be a poor internet connection that delays Gmail notifications and other reasons include but are not limited to bugs in the Gmail app, background data restriction, outdated app settings, aggressive battery optimization, and more.
How to Quickly Fix Delayed Gmail Notifications on Your Android Phone
In this Page
- Common Causes of Delayed Gmail Notifications in Android
- How to Quickly Fix Delayed Gmail Notifications on Your Android Phone
- 1. Check your Gmail App Notification Settings
- 2. Check Gmail Notification Categories
- 4. Sync Gmail Notifications
- 5. Troubleshoot Your Internet Connection
- 6. Restart Your Device
- 7. Check Do Not Disturb Schedules
- 8. Lock Gmail in the Background
- 9. Allow Unrestricted Battery Usage to Gmail
- 10. Clear Gmail Cache
- 11. Free Up Storage Space
- 12. Update the Gmail App
- 13. Factory Reset Your Android Smartphone
- Tips to Improve Gmail Notifications on Android
- Get Instant Gmail Notifications on Android
1. Check your Gmail App Notification Settings
Gmail comes with in-app notification settings that let you control how notifications from the Gmail app are displayed on your Android smartphone. These settings help users to control the type of notifications they receive and how they are displayed. Make sure that you have configured the in-app notification settings correctly to avoid delayed notifications.
- Open the Gmail app on your Android smartphone.
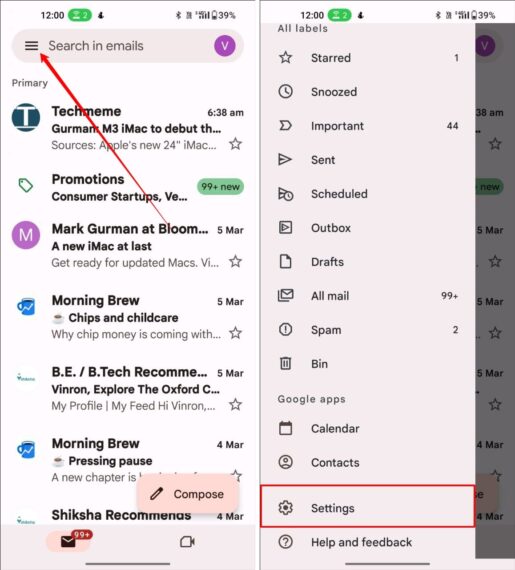
- Tap on the Hamburger menu located in the top left corner and select Settings.
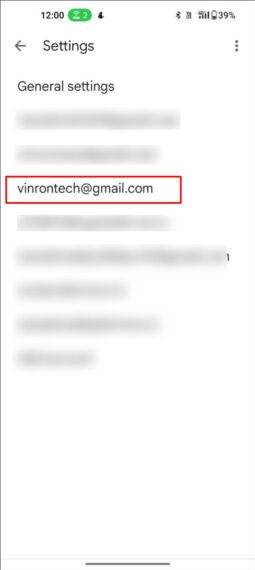
- Choose your Gmail account
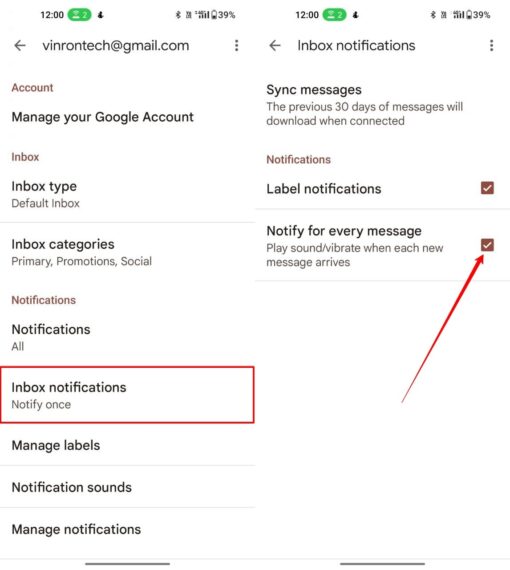
- Under the Notifications tab, click on Notifications and select ‘All’.
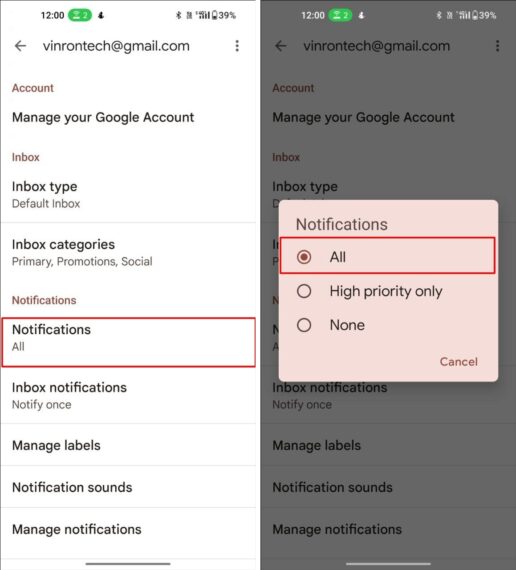
- Next, tap on the Inbox notifications and enable the checkbox with the label “Notify for every message”.
- If you have multiple accounts, follow the same procedure for each email.
2. Check Gmail Notification Categories
If you configured Gmail in-app notification settings correctly but still don’t receive email notifications, check the device notification categories for the Gmail app. From Android Oreo (8.0+), you can display or hide notifications from specific channels. Follow the steps below to allow mail notifications on the Gmail app.
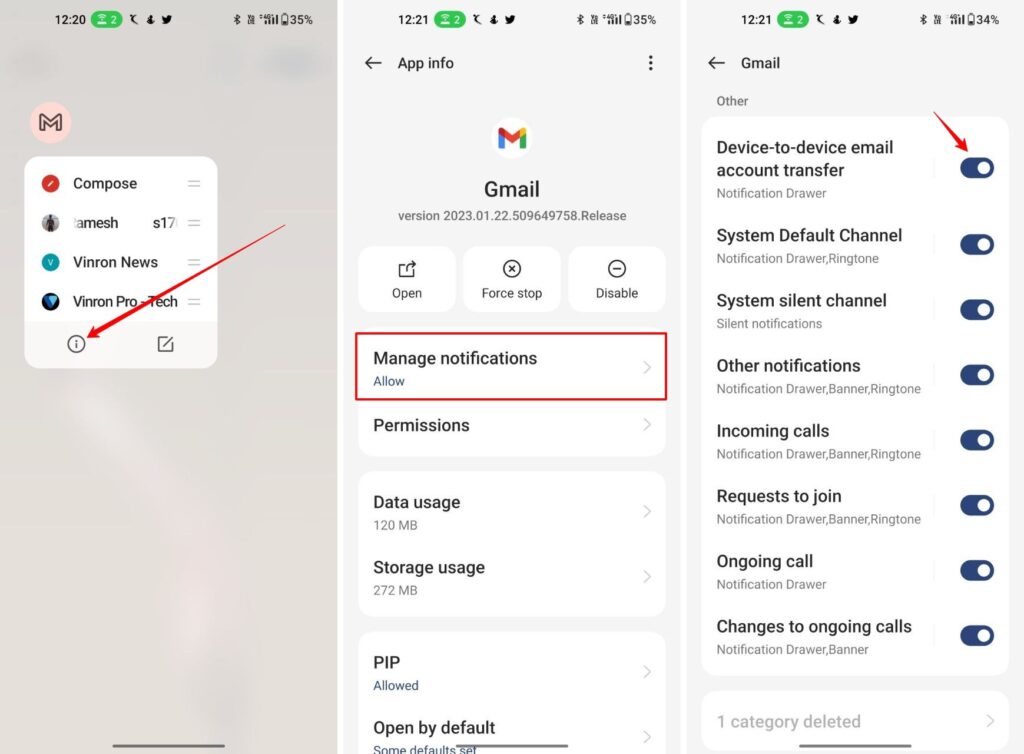
- Open your smartphone and long press on the Gmail icon.
- Tap on the Info (i) icon to open Gmail App Info.
- From the app info, go to Manage Notifications.
- Now toggle on all Notifications channels.
4. Sync Gmail Notifications
Syncing data allows you to use your Gmail account between devices seamlessly. When you enable the Sync option in Gmail, the data is the same on all your devices. It also allows you to get timely email notifications when you receive an email. To sync Gmail notifications on Android, follow the steps below:
- Open the Gmail app on your Android device.
- Tap the Hamburger menu at the top-left and select Settings.

- Select your Gmail account

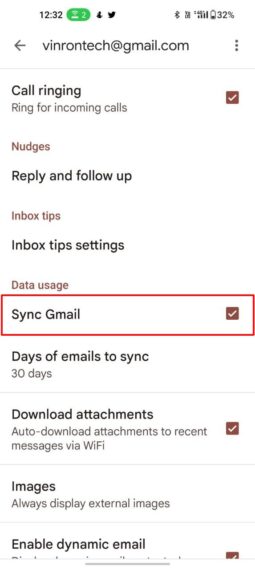
- Scroll down to the data usage section and enable Sync Gmail.
5. Troubleshoot Your Internet Connection
Gmail needs an active and stable internet connection to work. If your device is having issues with the internet, Gmail can have issues while loading emails and receiving notifications. To fix this make sure that your smartphone is having a stable internet connection and no network issues. If you identified any network issues follow the troubleshooting techniques to fix the internet issue.
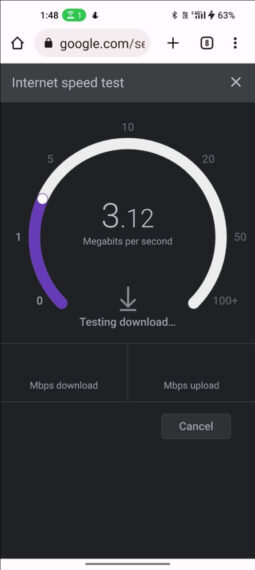
Here are steps you can try to solve network issues on your Android smartphone:
- Check your network connection: Make sure that you are connected to a Wi-Fi network or that your mobile data connection is turned on. If you are having trouble with a Wi-Fi connection, try moving closer to the router or resetting the router.
- Turn Aeroplane mode On and Off: Toggling the Aeroplane mode on and off can sometimes help resolve network issues. You can find Aeroplane mode in your quick settings or in the Settings app.
- Check for software updates: Make sure that your device is up to date with the latest software updates. Go to the “Settings” app, select “System”, then “Software update” to check for updates.
- Clear the cache of the network-related apps: Go to the “Settings” app, select “Apps”, then select the app related to your network connection (such as the browser, Google Play Services, VPN, etc). Clearing the cache of these apps can help resolve network-related issues.
- Reset network settings: Go to the “Settings” app, select “System”, > “Reset options”, and then “Reset Wi-Fi, mobile & Bluetooth”. This will reset your network settings, including Wi-Fi, mobile data, and Bluetooth.
6. Restart Your Device
If the notifications were configured correctly and you still don’t receive notifications, try restarting the device. Restarting the device has many benefits including the fix for most common bugs like delayed notifications. Simply hold the power button and click on Restart.
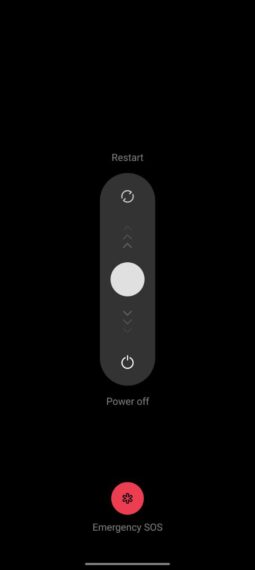
Restarting devices also come with other benefits like freeing up system resources, clearing the RAM cache, resolving issues with drivers, resolving performance issues, and much more. So it is already recommended to restart your smartphone once a week.
How to restart an Android smartphone (Common Technique)
- Press and hold the power button: Look for the power button on your device, which is usually located on the side of the device. Press and hold the power button until the power menu appears.
- Tap on Restart or Reboot: In the power menu, you should see options such as Power Off, Restart, or Reboot. Tap on the Restart or Reboot option. Some devices require a swipe.
- Wait for the device to restart: After tapping on Restart or Reboot, your device will shut down and then turn back on again. This may take a few minutes depending on your device.
- Unlock your device: Once your device has restarted, you’ll need to unlock it as you normally would access your home screen and applications.
7. Check Do Not Disturb Schedules
Do not disturb mode, short for DND, is a feature on Android smartphones that mutes all incoming notifications on your device and keeps your device on silent mode.
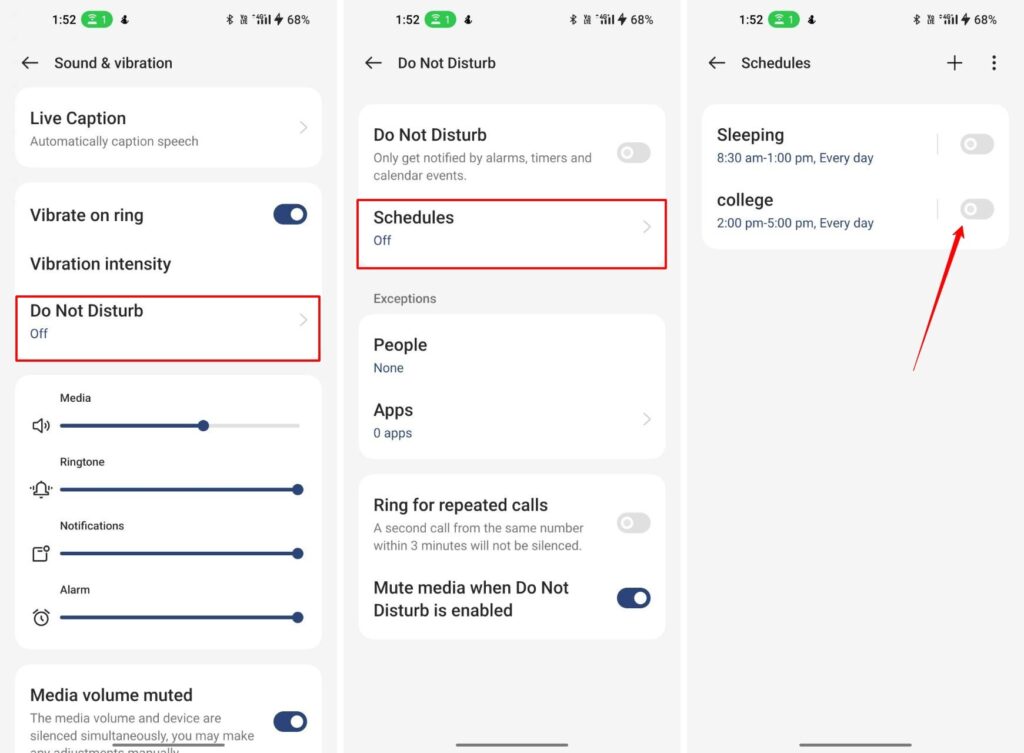
You can easily disable DND mode on your smartphone to resume Gmail Notifications. Also, make sure don’t have any DND mode scheduled. Scheduled DND mode will automatically pause notifications for a specific time. You can easily disable DND and turn off Do Not Disturb schedules on your Android.
- Open your smartphone and Go to Settings.
- Open Sound & Vibration.
- Now Tap on Do Not Disturb > Schedules > Toggle them off.
8. Lock Gmail in the Background
Make sure that you have the Gmail app up and running in the background. Removing the app from the recent app lists prevents the app from sending timely notifications. To fix this, Lock the Gmail app in the background to prevent accidental clearing of the Gmail app.
To lock the Gmail app in the background:
- Open the Gmail app.
- Now go to recent apps and find Gmail.
- Click on the three-dot menu on click on the Lock.
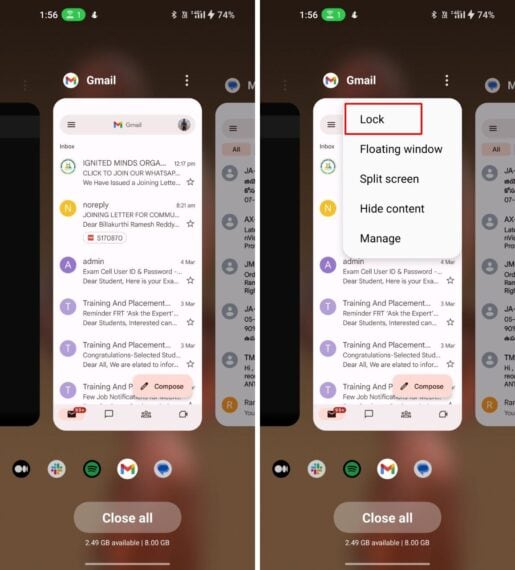
The settings may vary depending on the smartphone
9. Allow Unrestricted Battery Usage to Gmail
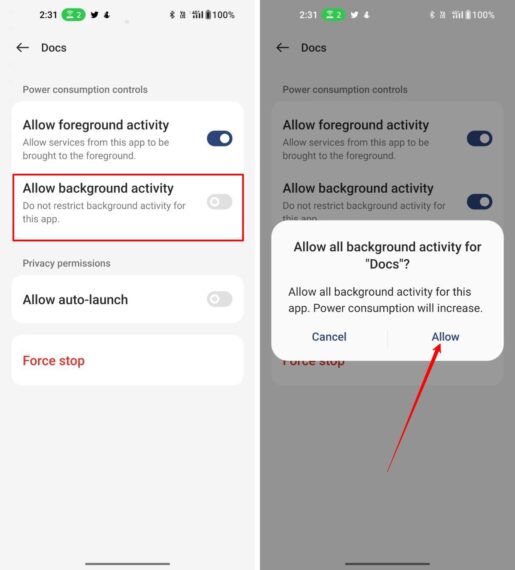
To prevent unwanted usage of battery and preserve battery life, many Android smartphones automatically restrict the battery usage of the app and prevent the app from running in the background. To resolve this you can allow unrestricted battery usage for the Gmail app.
- Open the Settings app on your smartphone.
- Go to Battery and then Optimise battery use (May vary depending on the smartphone company and brand).
- Now from the list of apps, Select Gmail and change the toggle Allow background activity to Allow.
10. Clear Gmail Cache
Cache data is the temporary files stored on your Android smartphone when you use an app. This data is then used to quickly gather information about the app and speed up the app loading and process when you’re revisiting the app.
Sometimes, the temporary data which is cached can create errors in the app. You can simply clear the cache of the app to fix the issue.
To clear the Gmail app cache on an Android device:
- Open the “Settings” app on your Android device.
- Scroll down and tap on “Apps” or “Application Manager“, depending on your device and Android version.
- Find the Gmail app.
- On the Gmail info screen, you should see an option that says “Storage“. Tap on this option.
- On the storage screen, you will see an option to “Clear cache“.
- A confirmation dialogue will appear asking if you want to clear the cache. Tap on “OK” to confirm.
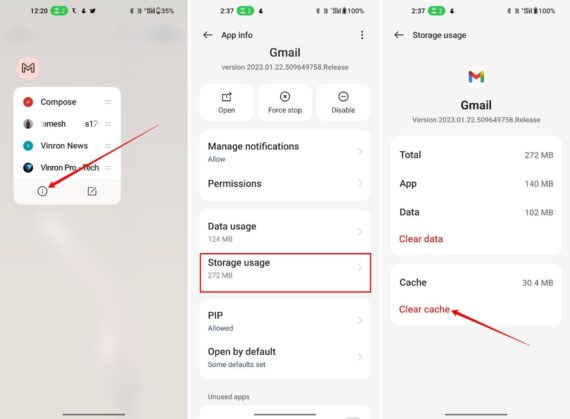
Alternatively, you can clear the cache for all apps on your device by following these steps:
- Open the “Settings” app on your Android device.
- Scroll down and tap on “Storage“.
- Tap on “Cached data“.
- A confirmation dialogue will appear asking if you want to clear the cache for all apps. Tap on “OK” to confirm.
You will find both Clear Data and Clear Cache while following the above steps. Make sure you delete only the Cache of the app. If you clear the App Data, the entire app will be reset and you need to reconfigure the app as if you freshly downloaded the app from Play Store.
11. Free Up Storage Space
Google provides 15 GB of storage to all its users, which is used to store the entire data related to that Google account, including Gmail, Photos, Slides, Docs, Sheets, and Drive.
If your storage is full, you cannot store new emails in your inbox, and this results in no notifications from Gmail. When this limit exceeds, you’ll get an error message saying, “Gmail Quota Exceeded,” and then you won’t be able to send or receive emails
To free up Gmail Storage
Delete unnecessary files in the Google Drive Storage:
The entire 15GB of space is allocated to all Google services combined which includes drive, photos, and Gmail. If any service takes up too much space, it automatically reduces the space in another service.
For example, if the drive is eating up your entire store, you will automatically run out of storage in Gmail and photos. To fix this, delete unnecessary files in the drive and photos, and also delete emails you no longer needed.
Create another free Gmail account and migrate the files:
You can create unlimited Gmail accounts for free. Google allocates 15 GB of free space for each account. If your current Gmail account is running out of space, you can create a new Gmail account and migrate existing data to the new account and save some space.
Also, make sure that you have enough local storage on your smartphone. Some users on Reddit reported not having enough storage on their smartphones is resulting in delayed notifications of the Gmail app.
To free up space on your smartphone:
- Go to your phone’s settings, and select “Storage.” You’ll see information on how much space is in use and a list of file categories.
- In Storage, tap on Apps. You’ll get a list of all your apps, along with how much space each app is taking.
- Tap on the app name. You can now see the app size, how much of the available storage is being used by user data, and how much space is being used by the cache. You can tap on the clear cache button to free up the space. You can also clear the app storage if it is occupying huge space due to offline downloads of videos and photos.
- You can also use apps like Google Files app to free up space by getting rid of junk files, screenshots, large photos, backed-up media, and unused apps.
- Another way is to clear large files such as videos to free up your storage. You can also copy the large files into external storage devices such as a PC or hard drive.
- If your smartphone comes with expandable storage you can purchase external SD cards to add more data.
12. Update the Gmail App
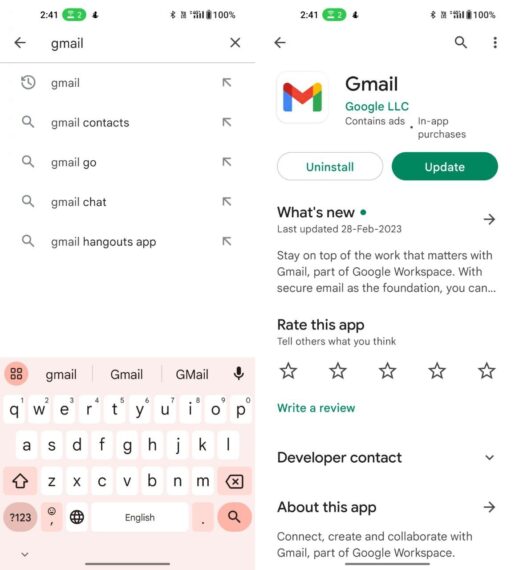
Sometimes the specific version of the app or an outdated app might create issues in the app. To fix this you can simply update the Gmail app.
- Open the Google Play store and search for Gmail.
- If the update is available, you will see an update button.
- Click on it to update Gmail to the latest version.
13. Factory Reset Your Android Smartphone
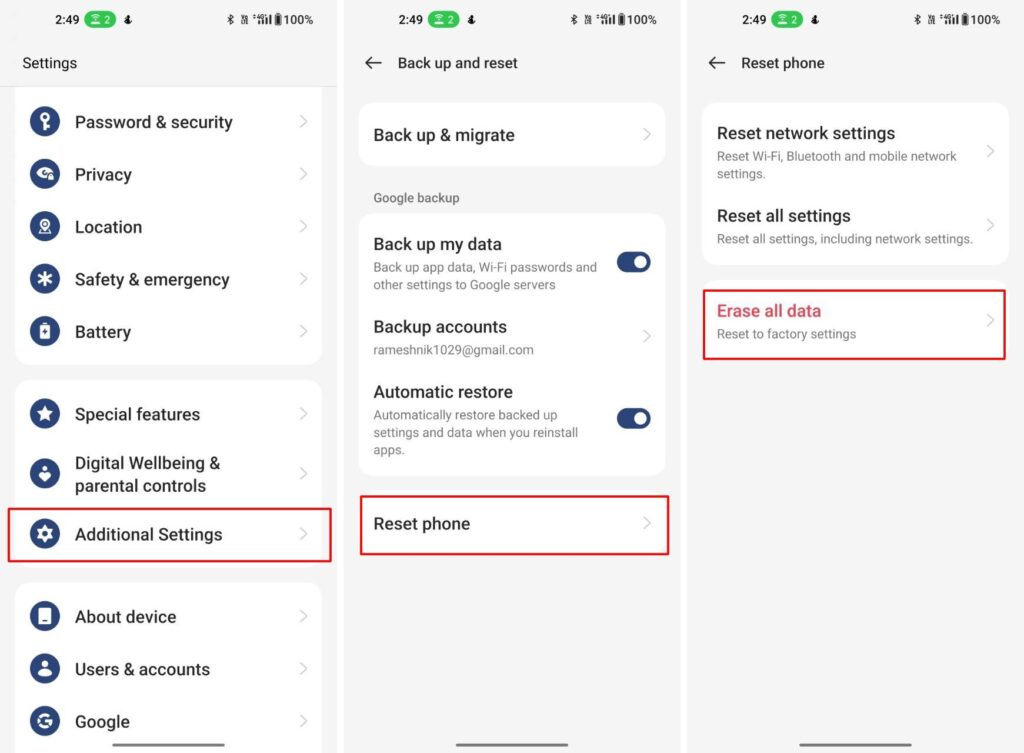
If you tried all the steps and didn’t work, try factory resetting your Android smartphone. This helps the device to remove any issues associated with the system and also remove any malware from your device. Factory resetting your smartphone should fix the delayed Gmail notifications issue.
How to Reset Your Android Smartphone
- Unlock your smartphone and open the Settings app.
- Scroll down to General Management.
- Select Reset to check several reset options available
- Tap Factory data reset to open the Factory reset page.
- On the Factory data reset page, review all the accounts and apps to make sure you have synced each of them recently. It’s a good idea to back up your data before performing a reset.
- Once you have confirmed that your accounts are synced and your app data is safe, scroll down and tap the Reset button.
- If you have a passcode login or pattern unlock set up, enter that to proceed.
- On the next Factory data reset page, tap the Delete All button to start the factory reset process.
Tips to Improve Gmail Notifications on Android
Enable Sync Settings
Make sure that Gmail Sync is enabled on your device. The Auto Sync in Gmail synchronizes emails, contacts, and calendar events automatically across all devices.
Ensure that Gmail is not Restricted by any Third-Party app
Check whether any other app is restricting the notifications of Gmail.
- Review authorized third-party apps: Before you restrict or remove third-party access to your Gmail account, it is recommended that you review the apps that have been authorized to access your account. You can do this by going to the Security section of your Google Account and selecting “Third-party apps with account access” and then “Manage third-party access”
- Enable two-factor authentication (2FA): Enabling 2FA adds an extra layer of security to your Gmail account and can help prevent unauthorized access by third-party apps. You can enable 2FA by going to the Security section of your Google Account and selecting “2-Step Verification”.
- Check out Notification blocking apps: Notification-blocking apps are third-party applications that can restrict or block notifications from specific apps, including Gmail. While these apps can be useful in some cases, they can also cause delays in receiving important messages or notifications. If you suspect that your Gmail notifications are being blocked by a notification-blocking app, you can go to your device’s app settings and disable or uninstall the app.
Keep Your Device and Gmail App Updated
Most of the users fail to care for software updates. Updates often contain bug fixes, security patches, and performance improvements that can enhance the functionality and reliability of your device and apps.
Get Instant Gmail Notifications on Android
There can be many reasons why your Gmail notifications are getting delayed on your smartphone. Most of the time configuring your device notifications and a simple restart can fix the issue.
In today’s fast-paced world, email is an essential tool for both personal and professional communication. Having timely notifications is crucial for productivity and communication. Delayed email notifications can cause a significant impact on your daily routine and miss out on important messages. Hence it is essential to ensure that you receive Gmail notifications on time and stay on top of your effective communication.
