AirDrop is one of the best features to use in the Apple Ecosystem. You can easily send files from an iPad, iPhone, and Mac to any other Apple device. Even though it’s a great offering from Apple, AirDrop might malfunction in some cases. In such cases, you might wonder why AirDrop isn’t working on your iPhone, iPad, or Mac.
AirDrop can have issues for many reasons, and there’s no certainty that one is causing the problem. In this method, we’ll show various ways to fix the AirDrop not working issue. But before that, you need to understand what AirDrop is and how it works.
What is AirDrop? How Does it Work?
AirDrop is Apple’s way of transferring files between Apple Devices like iPhone, iPad, and Mac. Apple introduced this feature along with Macs in 2008 and slowly expanded it to iPhone in 2013. AirDrop initially relied on the system hardware, and it failed often.
Therefore, Apple introduced its U1 chip to overcome this problem. Not everyone using an older iPhone, iPad, or Mac might have this chip. Hence, it might take a while for everyone to start using this chip. But once you understand how it works, things will get easier for you.
AirDrop uses Bluetooth 4.0 and above for discovering devices and WiFi to connect and transfer data between two devices. Apple also uses the U1 chip to transfer files faster among these devices. And that’s how AirDrop works on Apple devices. It’s similar to what you see on ShareIt, Xender, and other file transfer apps.
Before you go ahead with this guide, make sure that AirDrop supports your device natively. Here is the list of devices that AirDrop officially supports.
- The MacBook Pro (Late 2008 and Newer Models)
- MacBook Air (Late 2010 and Newer Models)
- MacBook (Late 2008 and Newer Models)
- iMac (early 2009 and Newer Models)
- iMac Pro (All Models)
- Mac mini (mid-2010 and Newer Models)
- Mac Pro (early 2009 with AirPort Extreme and Newer Models)
Other than those Macs, every iPhone, iPod Touch, and iPad running iOS 7 and comes with a Lightning Port is compatible with AirDrop.
How to Fix AirDrop Issues on iPhone, iPad, and Mac
You might face AirDrop issues on iPhone, iPad, and Mac. Hence, we’ll divide this guide into two parts—iPhone or iPad and Mac. iPhone and iPad use iOS and iPadOS, respectively; their processes are the same too. On the contrary, the Mac uses different troubleshooting methods.
Fix AirDrop Not Working on iPhone and iPad
There are various methods to troubleshoot AirDrop on an iPhone and iPad. However, there are some basic ways that you can follow to make sure that AirDrop is working again.
1. Check WiFi and Bluetooth Settings
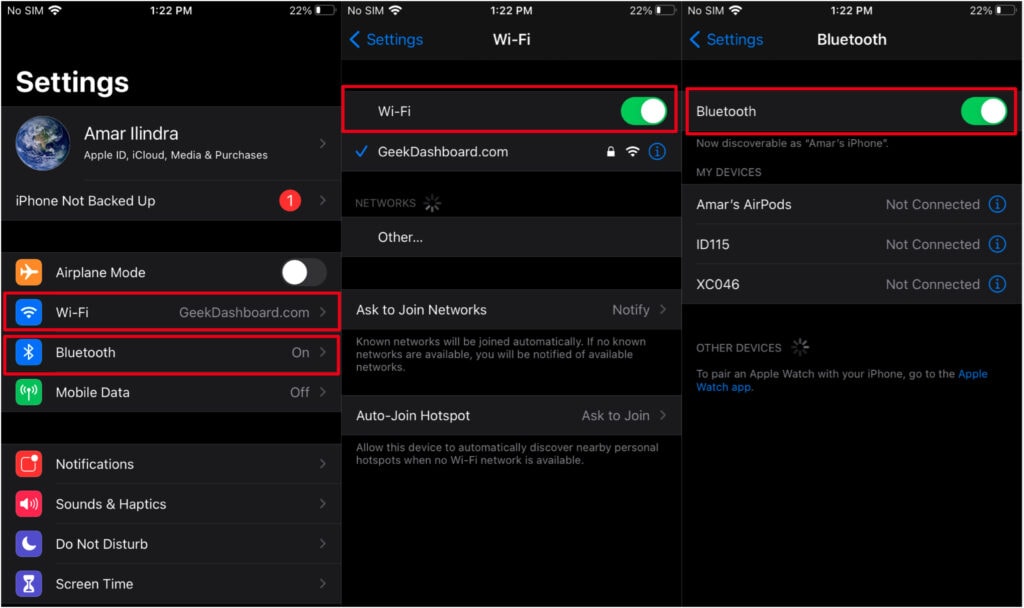
When AirDrop isn’t working on your iPhone or iPad, the first things you need to check are the WiFi and Bluetooth settings. AirDrop uses both Bluetooth and WiFi to transmit files. So you need to check your Bluetooth and WiFi settings on your iPhone or iPad. Here’s how to do it.
- Open Settings from Homescreen on your iPhone or iPad.
- Tap on WiFi.
- Toggle the WiFi toggle off and on to make sure its working.
- Go back, and Tap on Bluetooth.
- Toggle the Bluetooth toggle off and on to make sure its turned on.
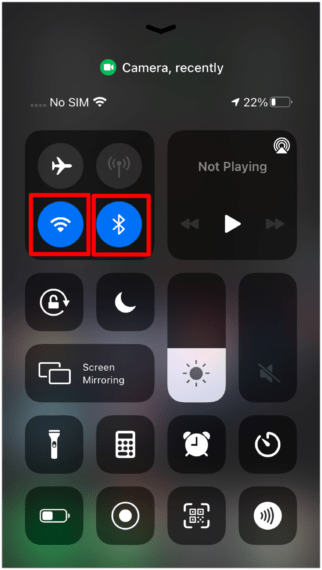
Alternatively, you can access the control center by swiping up from the bottom to toggle both WiFi and Bluetooth settings.
2. Check AirDrop Settings
If the Bluetooth and WiFi Settings have no issues, you need to check for your AirDrop settings. Here’s how to check the AirDrop Settings on your iPhone and iPad.
- Go to Settings from your Homescreen on your iPhone or iPad.
- Tap on General.
- Select AirDrop from the options.
- You can switch between two modes—Contacts Only and Everyone.
Contacts Only – This option lets you AirDrop to Apple devices within your Contacts list.
Everyone – This option allows you to AirDrop files to anyone with an Apple device.
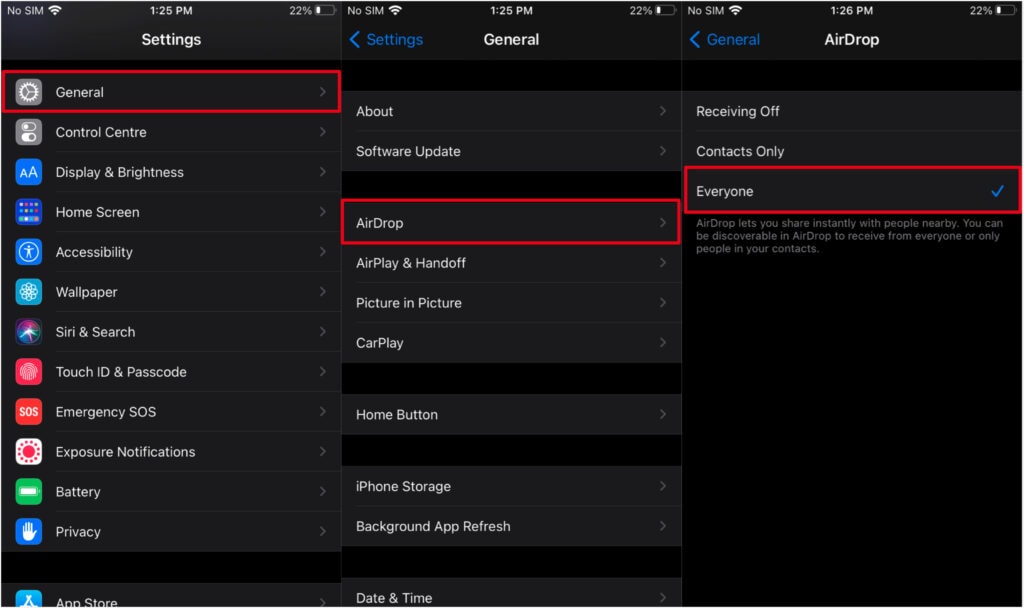
Check if you’ve set your option to “Contacts Only” when you’re trying to share files with someone outside of your contacts. If yes, change it to Everyone.
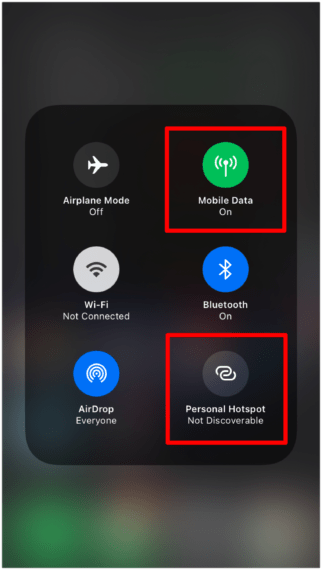
3. Check if Personal Hotspot is turned on
If everything mentioned above didn’t solve the problem, then you should try checking if Personal Hotspot is turned on on your iPhone/iPad or not. If it is ON, you wouldn’t be able to use AirDrop. Here’s how you can turn off or disable Personal Hotspot on your iPhone or iPad.
- Open Settings on your iPhone and iPad Homescreen.
- Tap on Personal Hotspot.
- Disable the “Allow Others to Join” option.
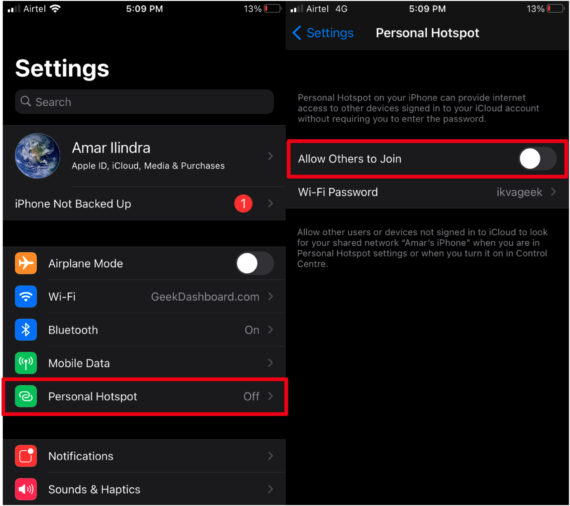
Note: If mobile data is turned off, you can not make any changes on Personal Hotspot. Make sure mobile data is turned on to make the above change.
You can also open Control Center on your iPhone and long-press or force touch the WiFi toggle and turn off the Personal Hotspot option. With iOS 13, you won’t be able to turn off the Personal Hotspot on your iPhone or iPad.
4. Turn Off Airplane Mode and Do Not Disturb
If you’re using iPhone or iPad, there’s a slight chance that you might have turned on Airplane mode and Do Not Disturb mode. These may interfere with the AirDrop and may face the AirDrop not working issue. Here’s how to Turn off Airplane Mode and Do Not Disturb on your iPhone and iPad.
- Open Settings on your iPhone and iPad from your Homescreen.
- Make sure the toggle next to the Airplane Mode option is disabled.
- Similarly select to the Do Not Disturb option.
- Turn the Toggle off next to Do Not Disturb.
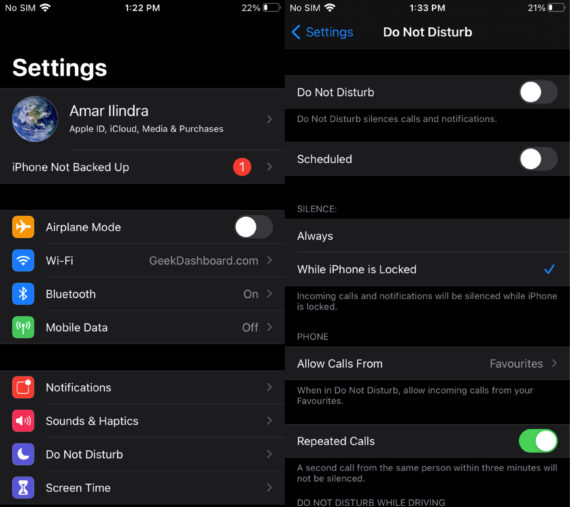
If that was the case on your iPhone, your AirDrop should work now.
5. Restart your iPhone or iPad
If you tried all the above methods and AirDrop doesn’t seem to work on your iPhone or iPad, go ahead, and restart your iPhone.
The procedure is different depending on the iPhone or iPad model you’re using. Here’s how to restart different iPhone and iPad models.
- iPhone X, 11, 12, 13, and above: Press and hold Volume up and the Power button until Power Slider appears.
- iPhone SE (2nd Gen), 8, 7, and 6: Press and hold the Power button until Power Slider appears.
- iPhone SE (1st Gen), 5, and Earlier: Press and hold the Power button on the Top until Power Slider appears.
- iPad without a Home button: Press and hold Volume up and the Power button on the top until Power Slider appears.
- iPad with a Home button: Press and hold the top Power button until Power Slider appears.
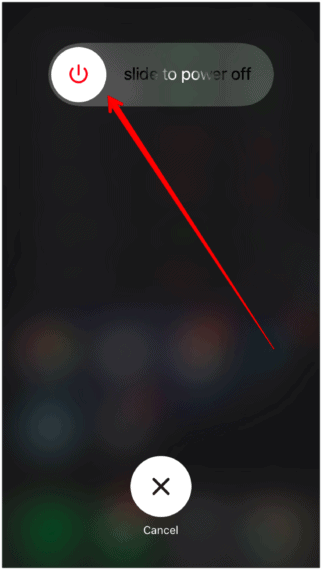
Once the power slide appears, drag and leave the slider to the right. Now, wait for 30 seconds for your iPhone/iPad to completely shut down. Again press and hold the Power button until the iPhone/iPad shows the Apple logo.
A restart of your iPhone or iPad should fix most of the issues, and you shouldn’t feel AirDrop not working again.
6. Reset iPhone/iPad Network Settings
When everything fails, it’s best to reset the Network settings as a last resort. A reset of Network settings will reset Bluetooth, WiFi, Cellular settings all at once without affecting your internal storage. Since AirDrop depends on Bluetooth and WiFi, a network settings reset might make your AirDrop work again.
Here’s how you can reset your iPhone and iPad’s Network Settings.
- Open Settings on your iPhone/iPad from Homescreen or App Library.
- Select General.
- Scroll down and tap on the Reset option.
- Choose the Reset Network Settings option.
- Enter password if prompted.
- Select Reset Network Settings again to confirm.
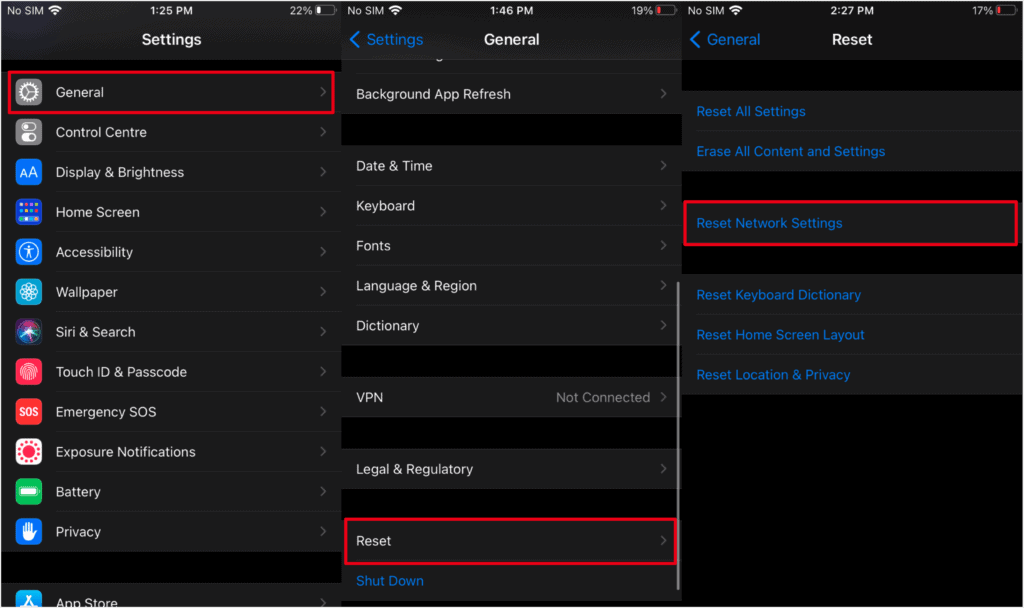
After doing this process, every saved WiFi and Bluetooth device will reset on your device. Also, every Saved network on your device will be gone. As a result, you need to connect to those WiFi and Bluetooth connections again manually.
Fix AirDrop Not Working on Mac
AirDrop doesn’t only have issues with iPhones and iPad; they also have problems with Mac. Here are the ways to make sure that the AirDrop works again on your Mac.
1. Check WiFi and Bluetooth
As mentioned previously, AirDrop uses WiFi and Bluetooth to transfer files between the devices. So you need to check your WiFi and Bluetooth settings to make sure everything is fine.
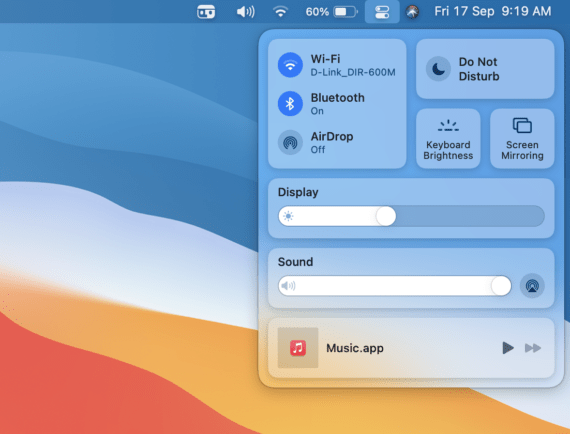
Checking WiFi and Bluetooth options is easy on Mac with macOS Big Sur and above. The macOS Bug Sur introduced Control Center, which gives you most of the controls in one place.
Thus, to enable WiFi and Bluetooth, go to the Control Center, select WiFi, and turn it on. Do the same for Bluetooth and turn it on.
You can also enable these settings by going into System Preferences > Network (for WiFi) and Bluetooth (for Bluetooth).
2. Check AirDrop Settings
If Bluetooth and WiFi settings have no issues, you should check for the AirDrop Settings. Like the previous options, you can also control AirDrop settings from the Control Center itself.
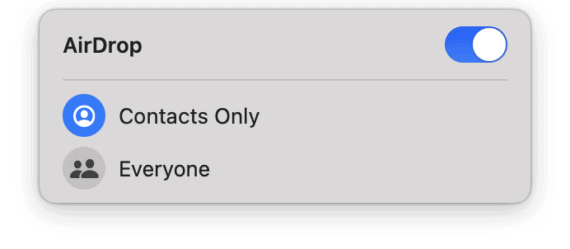
To check AirDrop Settings, go to Control Center, and enable the AirDrop toggle. Then, select the option best for your use case.
Here’s what both the options mean.
- Contacts Only – This option lets you AirDrop to Apple devices within your Contacts list.
- Everyone – This option allows you to AirDrop files to anyone with an Apple device.
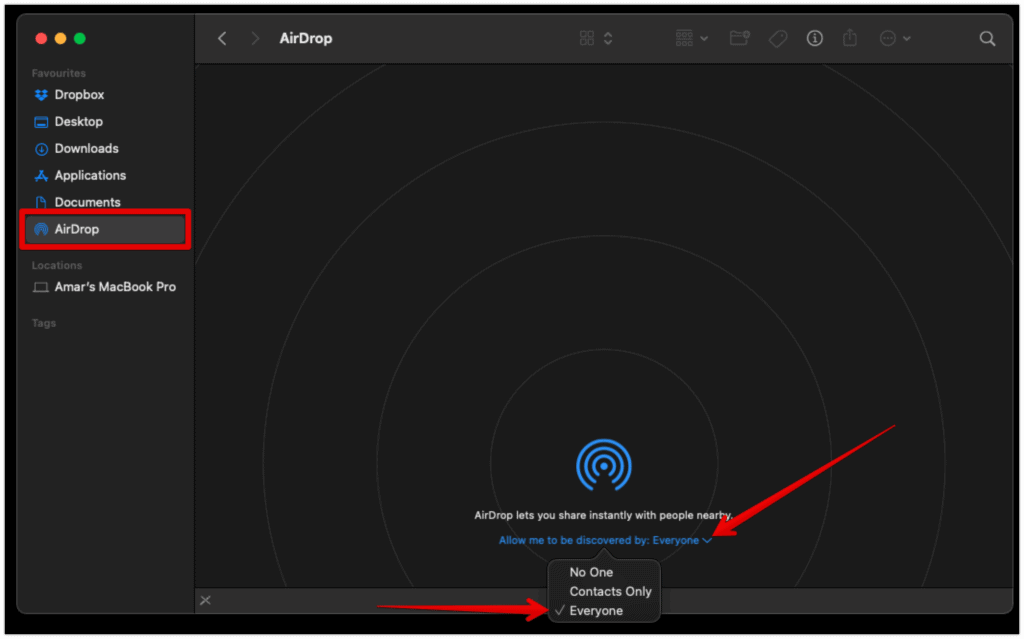
You can also access the AirDrop settings from the Finder by opening it and then selecting the AirDrop option from your Favorites menu.
Make sure that “No One” isn’t set, which means no one would be able to receive AirDrop files since it’s turned off. Either put it to “Contacts Only” or “Everyone,” depending on the person you’re sharing.
3. Turn off Do Not Disturb
Not always the case, but Do Not Disturb can interfere with your AirDrop connections (WiFi and Bluetooth), so make sure it’s turned off. You can check your Do Not Disturb Settings from the Control Center.
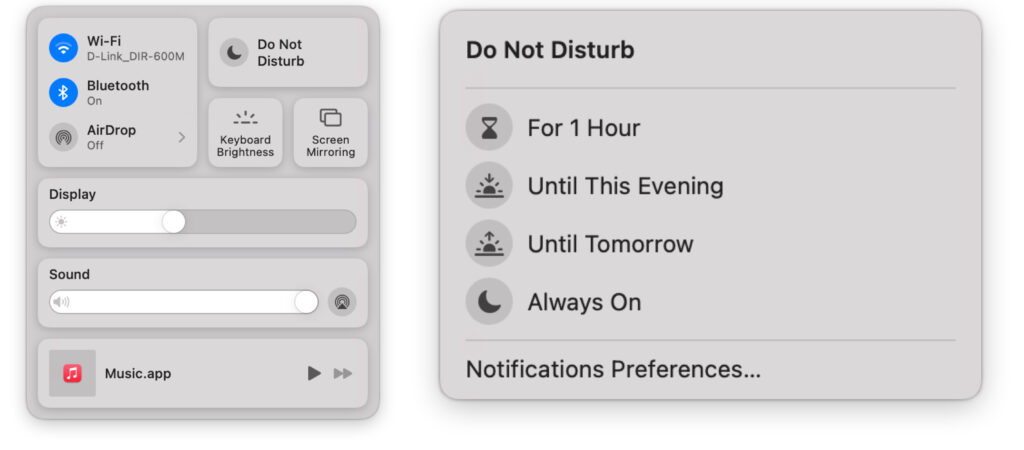
Click on Do Not Disturb from the Control Center, and it’ll turn ON/OFF once clicked. If you see the option turned Blue, then it is turned on. If not, you won’t see a blue color.
Also, you can see a Crescent Moon icon in the menu bar if it is turned on. This icon lets you know that the Do Not Disturb mode is enabled. If it’s turned on, it might interfere with WiFi and Bluetooth.
4. Reset Network Preferences
If you tried all the above methods and nothing worked for you, it’s best to reset your network settings on your Mac. It is a bit complex, but don’t worry. Here’s how you can reset Network Preferences on your Mac.
- Turn off WiFi from the Control Center.
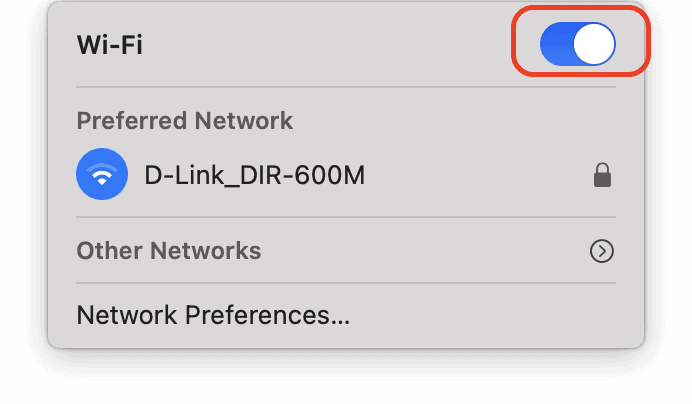
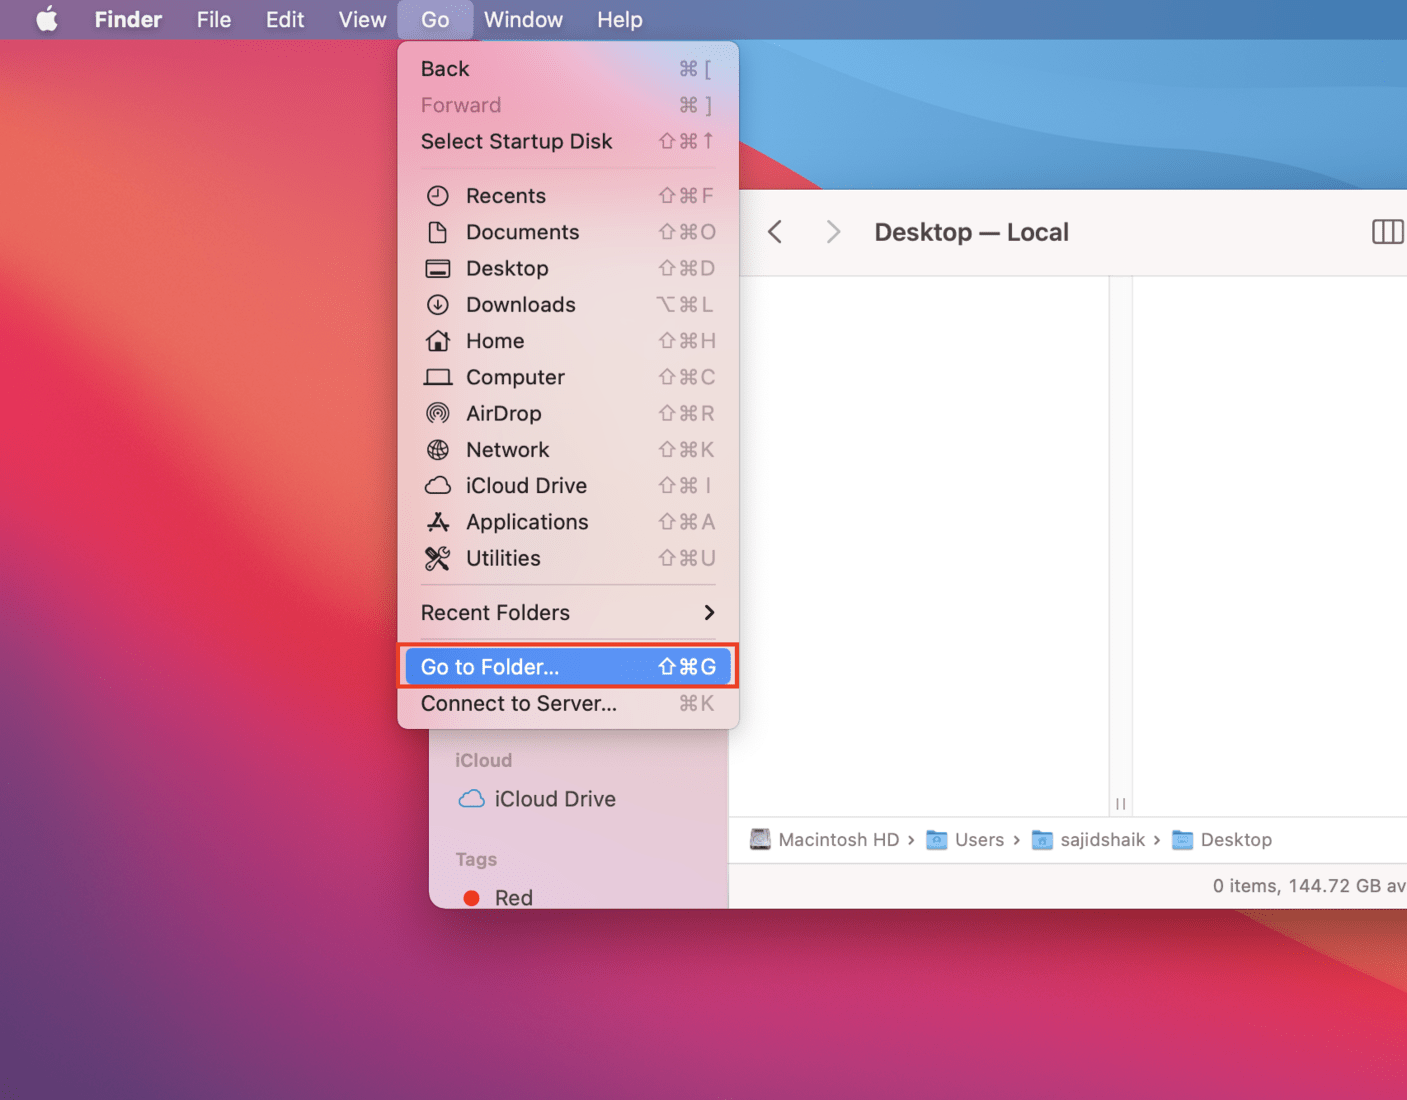
- Open Finder, and select Go from the menu bar.
- From the submenu, select the Go to Folder option.
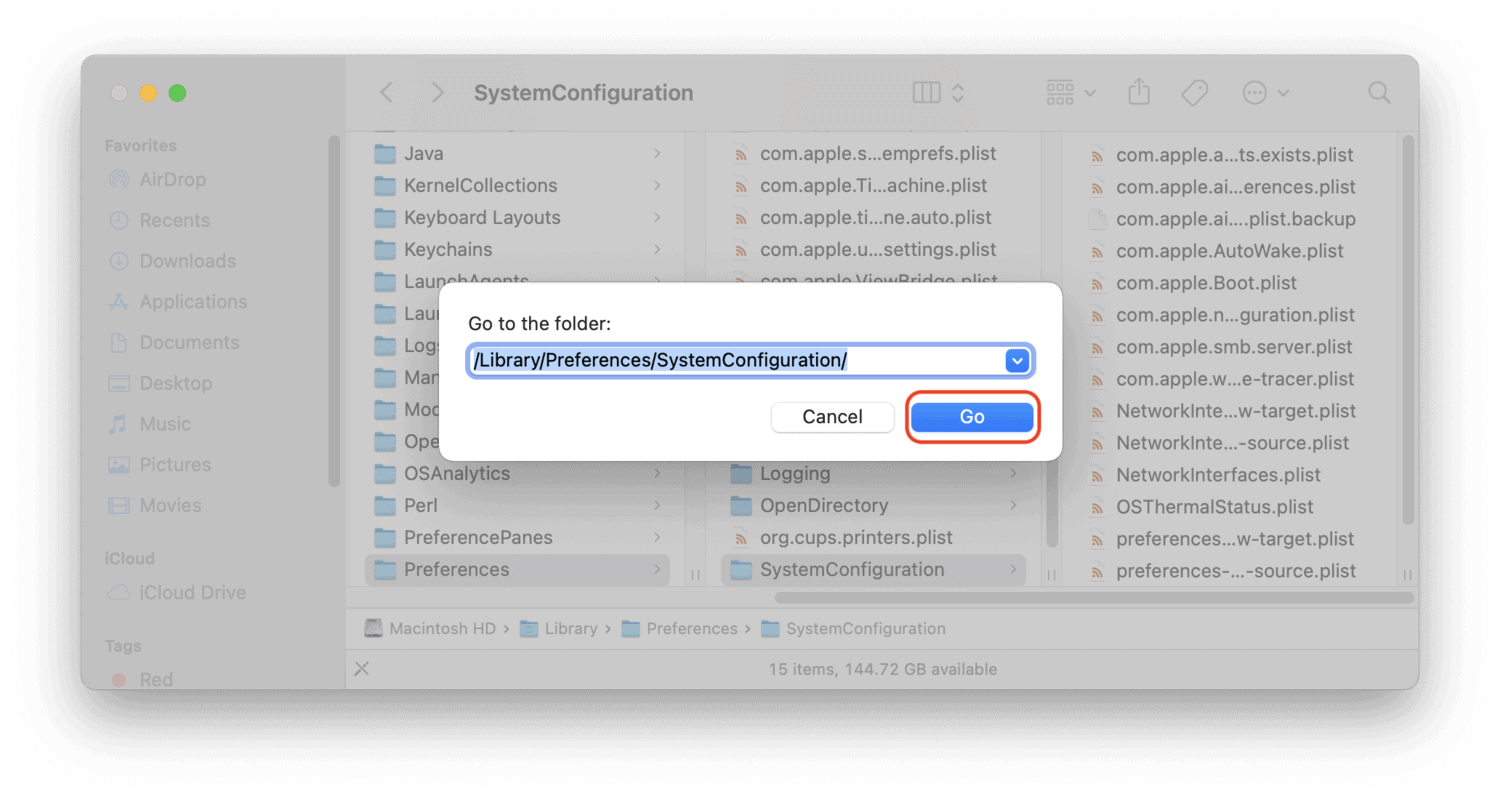
- Enter /Library/Preferences/SystemConfiguration/ in the text field, and then click Go.
- Holding the Command key, select these following files.
- com.apple.airport.preferences.plist
- com.apple.network.identification.plist or com.apple.network.eapolclient/configuration.plist
- com.apple.wifi.message-tracer.plist
- NetworkInterfaces.plist
- preferences.plist
- Copy all these files to your Desktop as a backup.
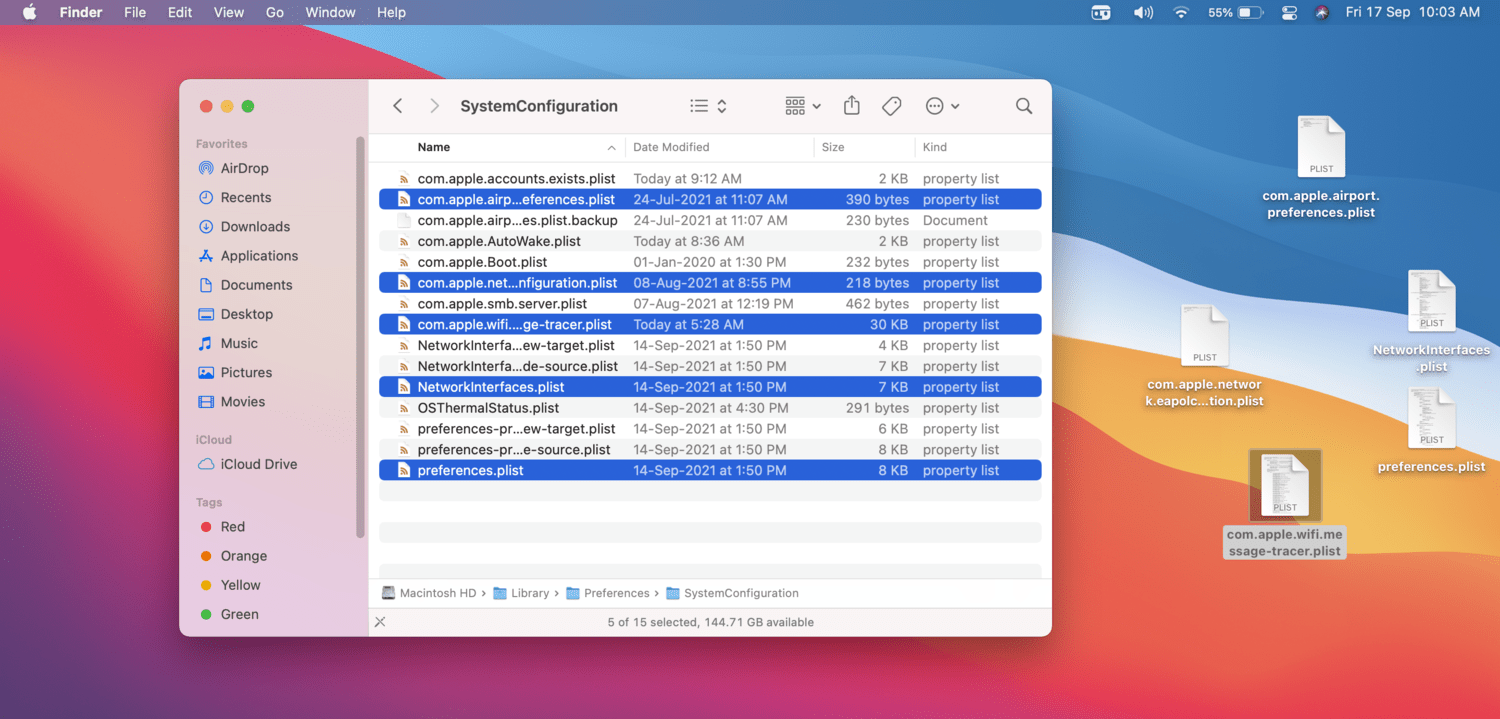
- Go back to Finder, and right-click on these files, and select the Move to Trash option. If asked for password or Touch ID, provide it.
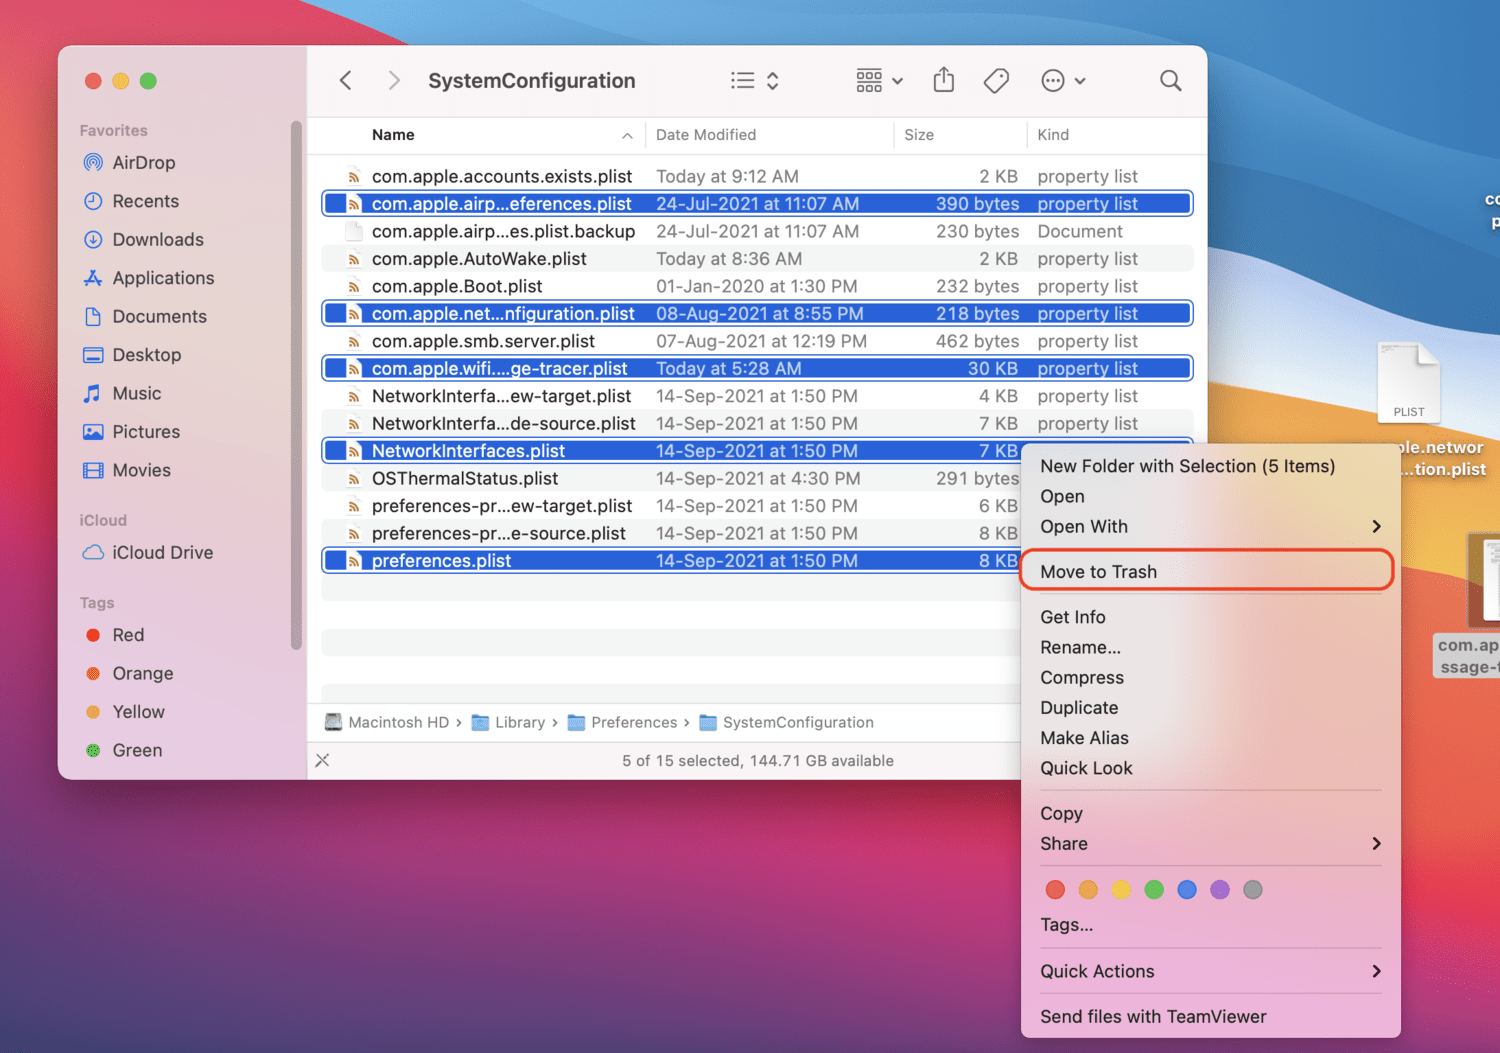
- Once deleted, restart your Mac, and turn on the WiFi again.
After all these methods, your AirDrop should start working now on your Mac.
Also Read: How to Block Websites in Safari Browser on your Mac, iPhone, and iPad
AirDrop Issue Still Troubles You?
The AirDrop is essential for transferring files between Apple devices, and when AirDrop doesn’t work, you’re bound to worry. We hope the above methods helped you in making AirDrop work again. These were the standard troubleshooting methods you can use when AirDrop is not working on your iPhone, iPad, or Mac.
If everything fails, make sure to reset iPhone, iPad, or Mac. And if that too doesn’t work, take it to a nearby Apple Store, and they should check for internal issues. If you’ve any further queries or suggestions regarding this, make sure to let us know in the comments below. We’ll try to answer them as much as possible.
