Unlike the other previous versions of Windows, there is no specific option to disable or turn off automatic updates in Windows 10. In the earlier Windows versions, there was an option to turn off automatic updates using the Control Panel settings. Well, there’s nothing more to worry about it now as we have found a solution about how to disable or turn off automatic updates in Windows 10.
However, before we get directly to the solution, let us understand why you would want to disable or turn off automatic updates in Windows 10.
Why Disable or Turn off Automatic Updates in Windows 10?
Well, who wouldn’t like new updates and an up-to-date operating system? Yet, it can be more hassle and less comfort than you can imagine. Yes, you read it right.
Since the upgrade to Windows 10, there are a lot of settings that is changed by Microsoft team to develop a cluster-free operating system for everyone. Automatic windows update is one of those features to help created such a magnificent operating system for your PC.
Windows updates can, of course, keep your machine up-to-date with latest operating system version and features but at the same time, these automatic updates would turn your PC slow while the updates are being downloaded.
Also, once the download is finished, Windows will automatically install them and restart your PC for the updates to reflect on your PC. Hence, if you are working on something important, these automatic updates can be a hassle and troublesome rather than comfort.
In Windows 8.1 and the earlier Windows versions, there was a completely separate Windows Update settings section where you can choose from the following options:
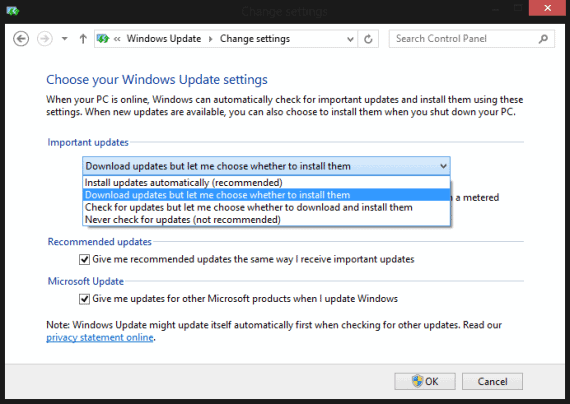
- Install updates automatically (Recommended)
- Download Updates but choose when to install them
- Check for updates but let me choose whether to download and install them
- Never check for updates (Not Recommended)
Based on the option you select, Windows will determine the flow of updates. For example, if you choose option 2, Windows will continue downloading the update automatically but wait for your approval to install them. Similarly, choosing option 4 will completely disable the automated functionality of downloading Windows updates.
Unfortunately, these settings are no longer available on Windows 10. However, Windows 10 would let you set a scheduled time to restart your PC after the updates are downloaded and installed. Also, if you are working on something at the same time as the updates are installed, Windows 10 will also notify whether you want to restart now or set it for a later time.
Nevertheless, the download process in the background is automatic and would disturb your workflow as it would slow down your PC while the updates are being downloaded.
To overcome this, there’s a workaround that could come handy and solve this problem forever. However, before we move on to this solution, you must understand that Windows updates are good and it helps your PC stay up-to-date with latest features, settings and fix common Windows 10 errors like start menu and Cortana bug.
So, it is advisable that you schedule a regular time to check for updates every week or 10 days and set your PC with latest updates if any available.
Workaround to Turn off Automatic Updates in Windows 10
Hence, there’s no option or settings for Windows 10 Automatic updates in the Update & Security Settings, you can access the Windows Update service here: Control Panel > Administrative Tools and you will find “Services” option.
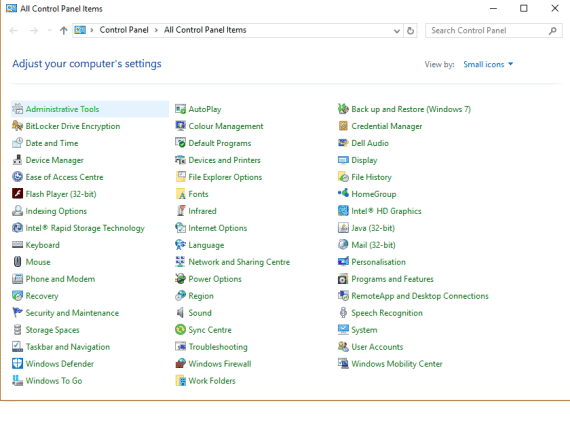

Double click the “Services” option and try to find Windows Update entry in the new window that opens up. Once there, right click on “Windows Update” and select “Properties” and then choose “Disabled” from the drop down box for Startup Type.
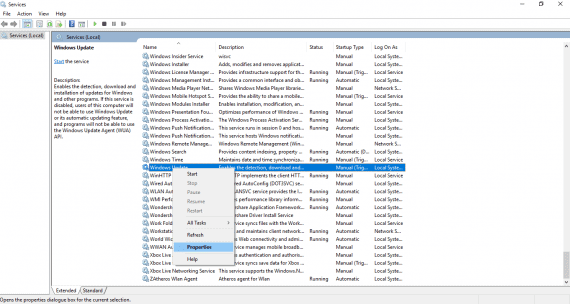
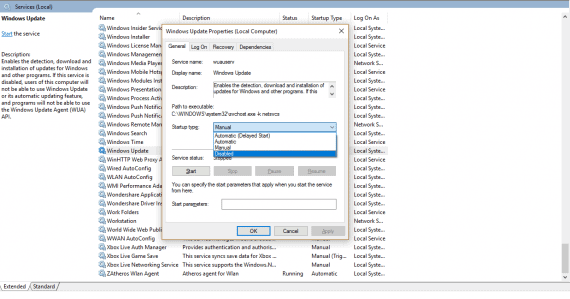
Now, you have disabled automatic updates in Windows 10.
However, it is not recommended or advised for long term solution. Because Windows updates are essential on your computer. So, you must enable this service again to download and install the fresh updates on your Windows 10 PC.
Once you turn on the automatic updates in Windows 10, you can find a message that says “Updates weren’t installed because Computer was stopped” as you open the Windows Update page via PC Settings. Just click “Retry” and the Windows will resume downloading and installing updates on your Windows 10 PC.
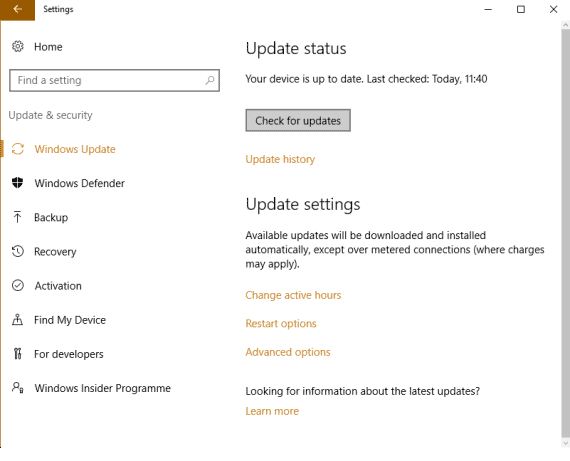
You must repeat the process by clicking “Check for Updates” until it says that your computer is up to date. Now, you can turn off or disable automatic updates in Windows 10 by following the method explained above until next time you are ready for updating your PC.
For the users with a version of Windows 10 that has Group Policy, there’s a different method to disable or turn off automatic updates in Windows 10 as well using the Group Policy Editor.
Run gpedit and follow the below navigation to reach the “Windows Update” setting:
Computer Configuration > Administrative Templates > Windows Components > Windows Update.
Double click on Configure Automatic Updates on the right side and alter the settings based on your needs.
You can also stop or turn off automatic updates in Windows 10 by setting your network connection to “Metered” under Settings > Network & Internet > Wi-Fi.
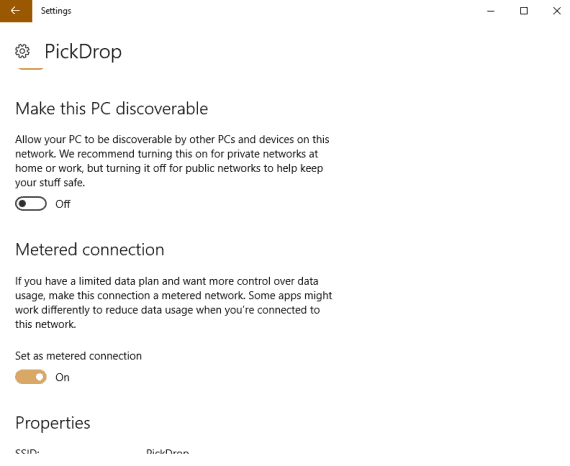
Once in the “Wi-Fi” option, click the active Wi-Fi connection and you can find the settings for that connection. Go to “Metered Connection” option and turn on the setting.
In addition, you can also choose to stop specific automatic updates in Windows 10 using a tool known as Show or Hide Updates.
This article is just for information purpose. We don’t advise or recommend to turn off automatic updates in Windows 10 as it is essential to keep your PC up to date and secured from other vulnerabilities. However, you can always choose to regulate the updates and choose to perform these updates when your computer is idle to ensure that the background downloading progress doesn’t hamper with your work.

Hi
Great step by step tutorial. An automatic update just made my SSD unusable and i had to reinstall windows 10 again. Now i have disabled it thanks to your post.