Monitoring the CPU Temperature in Windows 11 is crucial for you to determine the stress your computer is handling. If the temperature of the CPU is high, it means you need to stop a few background processes and reduce your workloads to maintain the normal temperature.
On the other hand, if the temperature is low, it indicates that you could perform demanding tasks like Video Editing, High Graphics Gaming, and 3D Modeling.
Now, the question arises, how to check CPU temperature in Windows 11? Well, You can use third-party applications like HWMonitor Pro, Core Temp, or Open Hardware Monitor to check the temperature directly in Windows 11.
How to Find CPU Temperature in Windows 11
In this Page
1. Core Temp
Core Temp not only tells the Core’s temperature but also helps us to identify the TDP and maximum safe operating temperature for the processor. It also helps to know which CPU socket type is in your motherboard. You can even add a temperature monitor to your taskbar with Core Temp.
Here is how you can find and monitor the CPU temperature in Windows 11 using Core Temp:
- Download and Install Core Temp on your system.
- Open the Application.
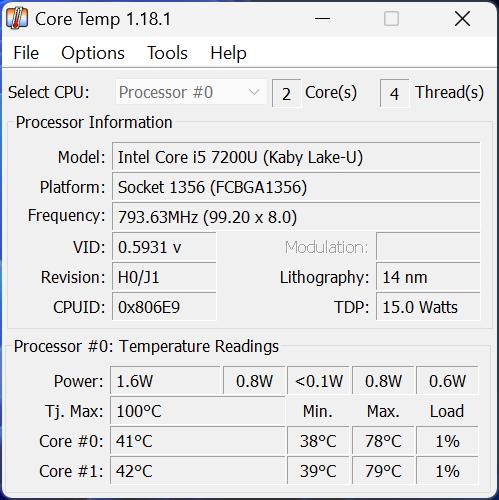
- Look for the Temperature Readings, you’ll see:
Tj. Max: Tjunction Max determines the maximum safe operating temperature for a CPU.
Core #0: Temperature of CPU Core 0.
Core #1: Temperature of CPU Core 1.
Similarly, Core #2, Core #3, etc depending on your processor.
This tool doesn’t show the Complete CPU Package Temperature in the app. However, the Cores and the Package Temperature have a very slight difference. Generally, the Package Temperature is slightly higher than the core temperature, because the Package Temperature is of the whole CPU which includes cache, ALUs, Registers, or Control Unit. While, cores are the components inside the CPU, whose temperature is slightly lower than the Package. Cores are suitable for handling the process of the computer.
Also, you can display the Highest Temperature live reading on the left side of your Windows Taskbar.
2. Open Hardware Monitor
Open Hardware Monitor is another free tool that shows the temperature of each core and CPU Package. You can even see the CPU Loads and Power Consumption by RAM or Graphics with Open Hardware Monitor.
- Download and Install Hardware Monitor on your system.
- Open the Application.
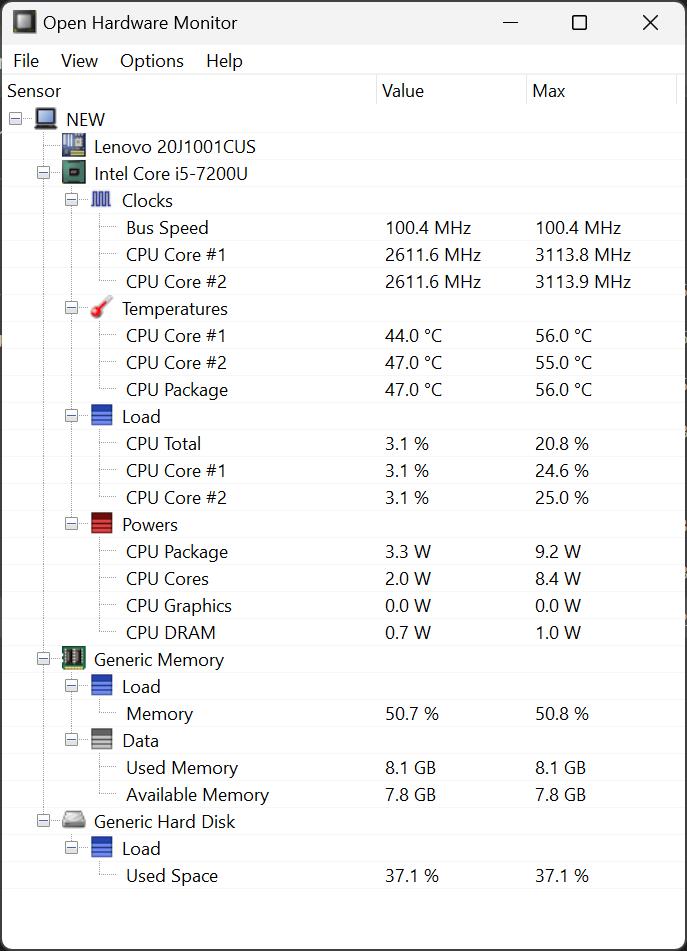
- Look for Temperatures, it will show:
Core #1: Temperature of CPU Core 1.
Core #2: Temperature of CPU Core 2.
CPU Package: Overall CPU Temperature.
If you want to know the Maximum CPU Temperature, then check for CPU Package in the Open Hardware Monitor tool. For checking the specific Core temperature, look for the core section. However, cores can be 4 or 6 based on your processor.
How to Show CPU Temperature in the Taskbar
The taskbar is a minimal location where you can see the CPU temperature. For this, you’ll need the Core Temp tool which not only shows the temperatures but also allows the functionality to add a measuring monitor on the Taskbar.
- Open Core Temp application.
- Choose Options, and then Settings.
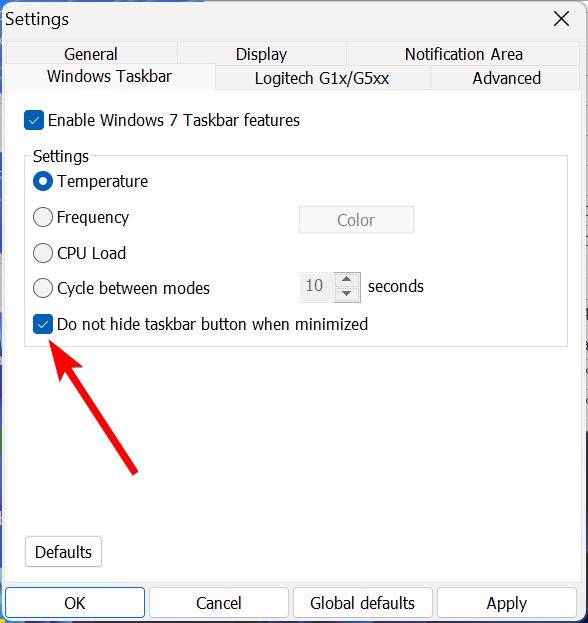
- Navigate “Windows Taskbar” and enable “Do not hide taskbar button when minimized”.
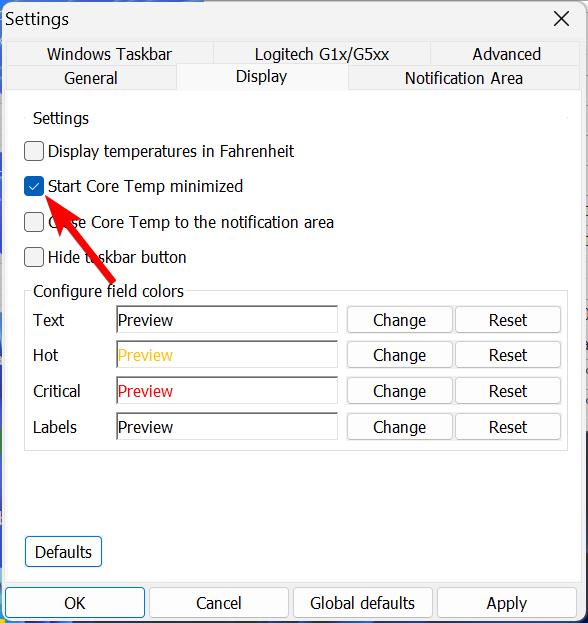
- Now navigate to “Display” and enable “Start Core Temp minimized”.
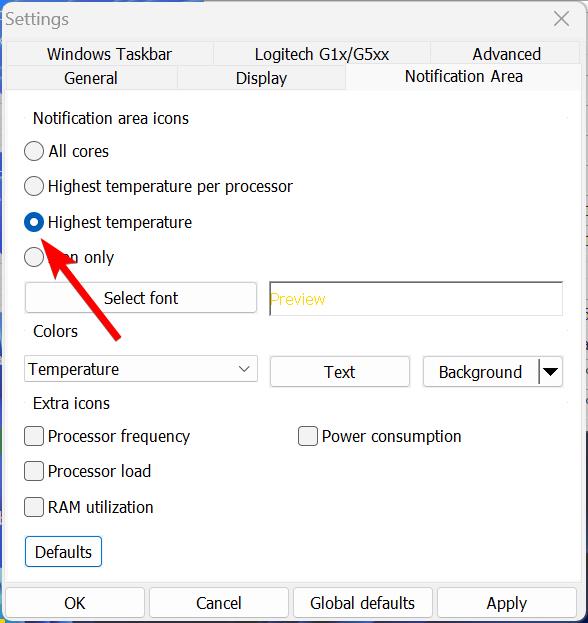
- Navigate “Notification Area”.
- Under “Notification area icons” settings, choose “Highest temperature” or another option you want to show in the Taskbar.
- Click Apply, and then OK.
- Minimize your Core Temp.
- Click the System Tray (^) icon from the left side of the Taskbar.
- Drag the Core Temp monitor to Just After the System Tray (^) of the Taskbar.

Make sure that you’ll need to always open the Core Temp application in the background to make the temperature monitor visible in the Taskbar. Alternatively, you can also run a program in the background without showing up in the Taskbar.
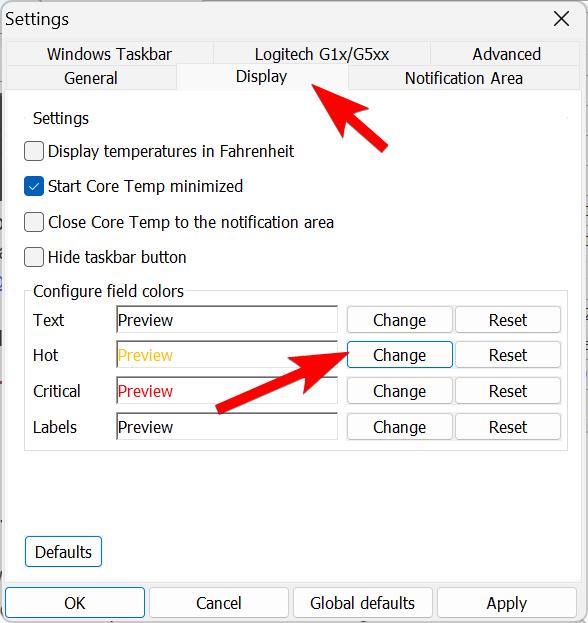
It shows the Hot temperature reading in Red color and the Critical temperature reading in Orange color by default in the Taskbar. However, you can change the colors from Core Temp Options > Settings > Display > Change.

What is the Normal Temperature of CPU in Windows 11?
The temperature of the CPU depends on the work you’re performing. Technically, the CPU temperature ranges from 30-90 °C. The normal temperature of the CPU ranges from 30-55 °C. When the Temperature reaches 65 °C, it indicates that workloads to the CPU are high. However, some CPUs approach 90 °C, which is quite hot and generally happens when you’re overclocking the CPU.
Normal Tasks (30-55°C): Web browsing, Document editing, Watching videos, Sending emails, Basic photo editing, and Simple gaming (e.g. casual games).
Moderate Tasks (65°C): Running multiple applications simultaneously, Video editing, 3D rendering, Running virtual machines, Playing graphics-intensive games, and Compiling code.
High-Temperature Tasks (90°C): Overclocking the CPU, Running stress tests, Operating the CPU under inadequate cooling conditions, and Running tasks that push the CPU to its limit, such as complex calculations.
How can I reduce the CPU Temperature?
There are several tips that you can follow to reduce the overheating issues from your CPU:
1. Proper Ventilation
Make sure your Computer or Laptop has proper ventilation and airflow. Avoid placing it on soft surfaces like carpets, beds, or crouches that can block the air vents. Also, it’s better to clean your computer and laptop including its internal components. The dust absorbs the heat, so your components including the CPU will heat more if the dust is present inside the computer.
2. Use Less Apps in the Background
Try to use less number of apps in the background on your computer. Every app consumes power to run effectively. So, the CPU needs to handle it and give efficient power for optimal performance, which generates heat. The recommended background application number depends on your processor’s core. If the processor offers 2 Core, it means that it is capable of handling 2 background apps effectively.
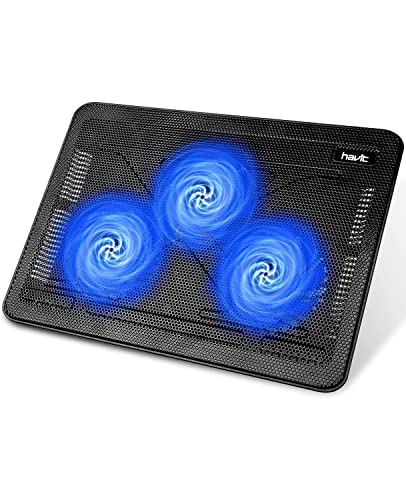
3. Use the Best Cooling Fan
Another tip is to use the Best Cooling Fan for your CPU, as it helps in heat dissipation for better cooling. For laptops, use a stand that will lift the laptop from the ground, helping in better heat flow.
- [Ultra-portable]: slim, portable, and light weight allowing you to protect your investment wherever...
- [Ergonomic comfort]: doubles as an ergonomic stand with two adjustable Height settings
- [Optimized for laptop carrying]: the high-quality multi-directional metal mesh provides your laptop...
- [Ultra-quiet fans]: three ultra-quiet fans create a noise-free environment for you
4. Apply New Thermal Paste
Thermal Paste is a hard liquid that we insert on the top processor body. It helps to dissipate the heat generated by the CPU. Thermal Paste decreases its efficiency as time passes. The older the Thermal Paste becomes, the CPU will produce more heat.
So, remove the already applied thermal paste and apply a new one to the CPU. It’s recommended to do this process at least once every 6 months. If you don’t know how to apply thermal paste, then visit your nearest computer shop.
Conclusion
Checking the Temperature of your CPU helps you to determine how much heating it is producing. If the temperature is high, you will get an indication that it will soon start to lag. Also, checking temperature gives you an indication which helps to save the computer from heat damage.


