Application monetization is an absolute way of earning money through an application. And Apple iOS serves the best medium for making money by monetizing application for in-app purchase.
The recent reports and surveys have dictated that iOS platform has generated over 85 percent more revenue than the Android platform. This remarkable difference proves that the Android platform is better for advertising purpose whereas the iOS platform is great for in app purchases.

If you have successfully created your iOS application, you probably are interested in learning how to monetize an iOS app. Along with several frameworks, APIs, SDKs, etc. Apple features an iAd platform that enables app publishers to easily monetize their apps. With this the publishers can either choose to add a banner ad, full-screen ad or both types of ads into the iPhone application.
How to monetize an iOS application with iAd and make money from it
Here is a comprehensive guide that shows how one can efficiently integrate Ad banners in their iPhone application.
1: First Things First: Get yourself registered for iAd
For accessing the iAd platform, you will need to enroll yourself under the Apple iOS Developer program; it will charge an affordable annual membership fee and that would be completely worthy as you are going to monetize your iOS application.
After enrolling in the program, you need to set up your contracts by logging into your iTunes Connect account. Click on the next screen and request for the “iAd App Network”. Then after doing so, fill in the mandatory fields and review the contract and agree to the mentioned terms and conditions (if there is nothing fussy).

Fill in the pending contract details by going back to the Contracts screen. The system will automatically guide you through the setup process for each info.

2: Go Thoroughly Through The Terms Used In The iAd Setup Guide
The iAd Setup Guide features some key points that have explained below.
- Join the iAd App network in order to use the iAd platform in your application. This is what we have done in the 1st
- A part of the screen is consumed by the banner views to showcase a banner Ad. Basically the banner ad is displayed at the bottom of the screen. And in this integration, we will make it visible only when it has been downloaded completely otherwise, not.
- Full-screen ads offers a large space and look amazing when accessed over large-screen iOS devices. Another way of integrated ads in an application is using a full-screen ad. You may integrate this type of ad as an entirely dedicated page within a magazine application.
- Interrupt the not-so-important applications for a few seconds when a user is interacting with the in-app advertisements.
- If an ad gets canceled by the users, it will leave a negative impact on your application.
- After integrating the iAd, validate your iAd support by testing the execution of the integrated ad before launching the application publicly in the Apple App store.
3: Steps To Be Followed For Integrating The Banner Ad At The Bottom Of Your Application
Here, I will explain you step by step how to integrate a banner ad
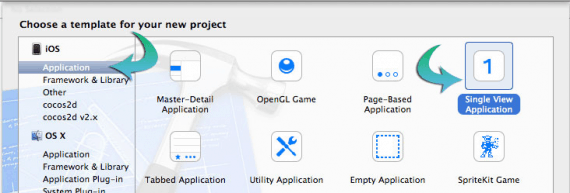
To create a sample project, first you will need to navigate to the “Single View Application” . After doing so you will get a form, fill in the requite fields and submit the details.

Step A: How to add iAd framework to the Xcode project

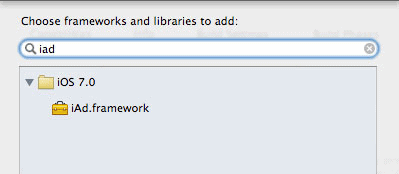
Under the “General” option, navigate to the “Project Settings”. Then, at the bottom of the page, you can find a list of options including “Linked Frameworks and Libraries”.
Expand the associated list attached to this option and look for iAd framework. Select it to add it into the project, now you can deploy the iAd classes in your project.

Step B: How to create, initialize and integrate the object “AdBannerView” to the view
Open the ViewController.m and the below mentioned chunk of code under the “viewDidLoad” method.
Code Snippet:
#import "ViewController.h"

#import <iAd/iAd.h>

@interface ViewController ()

@end

@implementation ViewController

- (void)viewDidLoad

{

[super viewDidLoad];

}

- (void)viewDidAppear:(BOOL)animated

{

[super viewDidAppear:animated];

ADBannerView *adView = [[ADBannerView alloc] initWithFrame:CGRectMake(0, self.view.frame.size.height - 40, 290, 40)];

[self.view addSubview:adView];

}
In the aforementioned piece of code, the iAd framework is imported, so as to get an access to its classes. And, the “viewDidAppear” method has been overriden to assign the desired size and position to the “AdBannerView” object. After initializing its value, it has been added to the view.
Step C: How to make the banner ad animate while fetching an ad successfully
- Identify and notify the “ViewController” whenever a banner has been fetched successfully. To notify the “ViewController“ object about each successful fetching of a banner, you will need to make the object conform to the “AdBAnnerDelegate” To do this you can add the lines of code mentioned below in the “ViewController.h”.
Code Snippet:
#import <UIKit/UIKit.h>

#import <iAd/iAd.h>

@interface ViewController : UIViewController<ADBannerViewDelegate>

@end
- Now, you will need to modify the code a bit in the “ViewController.m”.
Code Snippet:
#import "ViewController.h"

@interface ViewController ()

{

BOOL _bannerIsVisible;

ADBannerView *_adBanner;

}

@end

@implementation ViewController

- (void)viewDidLoad

{

[super viewDidLoad];

}

- (void)viewDidAppear:(BOOL)animated

{

[super viewDidAppear:animated];

_adBanner = [[ADBannerView alloc] initWithFrame:CGRectMake(0, self.view.frame.size.height, 290, 40)];

_adBanner.delegate = self;

}
If we will compare the code modification for ViewController.m from step B to C, it can be observed that –
- Since iAd framework has been imported in the ViewController.h, it has been removed from here.
- To track the banner availability some additional instance variable has been included.
- The “adBanner” object has been created and assigned the instance var.
- To refer to the “ViewController” object the the delegate for the banner has been set as “self”.
- To notify the successful downloading of an ad, the AdBanner delegate has to be deployed as mentioned in the below chunk of code.
Code Snippet:
- (void)didReceiveMemoryWarning

{

[super didReceiveMemoryWarning];

}

- (void)bannerViewDidLoadAd:(ADBannerView *)banner

{

if (!_bannerIsVisible)

{

if (_adBanner.superview == nil)

{

[self.view addSubview:_adBanner];

}

[UIView beginAnimations:@"animateAdBannerOn" context:NULL];

banner.frame = CGRectOffset(banner.frame, 0, -banner.frame.size.height);

[UIView commitAnimations];

_bannerIsVisible = YES;

}

}

- (void)bannerView:(ADBannerView *)banner didFailToReceiveAdWithError:(NSError *)error

{

NSLog(@"Failed to retrieve ad");

}

@end
Now, whenever an ad gets successfully fetched, the delegate method “bannerViewDidLoadAd” will be implemented.
Congratulations! Now You Can Submit Your App in The App Store
After following the aforementioned steps, your application is ready to be launched publicly. Submit it in the App store and wait for the approval.
With this tutorial, you can efficiently integrate banner ads in your application. The efforts and time that would be consumed while monetizing your application will offer you lucrative results.

Such good information provided by EMILY HEMING, As EMILY discussed Apple iOS serves the best medium for making money by monetizing application. I agree with these words.